Veyon Eye Logo

Veyon Master v4.11.3

Panduan Bergambar Pemasangan & Pemantauan Makmal Komputer • SK Dataran Muda

TEACHER PC (GURU) Langkah 1 / 26
Gunakan kekunci ← → untuk menatal slaid mendatar | Tekan G untuk togol Grid
Langkah 1: Download Required Setup Files from tr.ee/aJwAd
Klik untuk Skrin Penuh
LANGKAH 01 TEACHER PC (GURU)

Download Required Setup Files from tr.ee/aJwAd

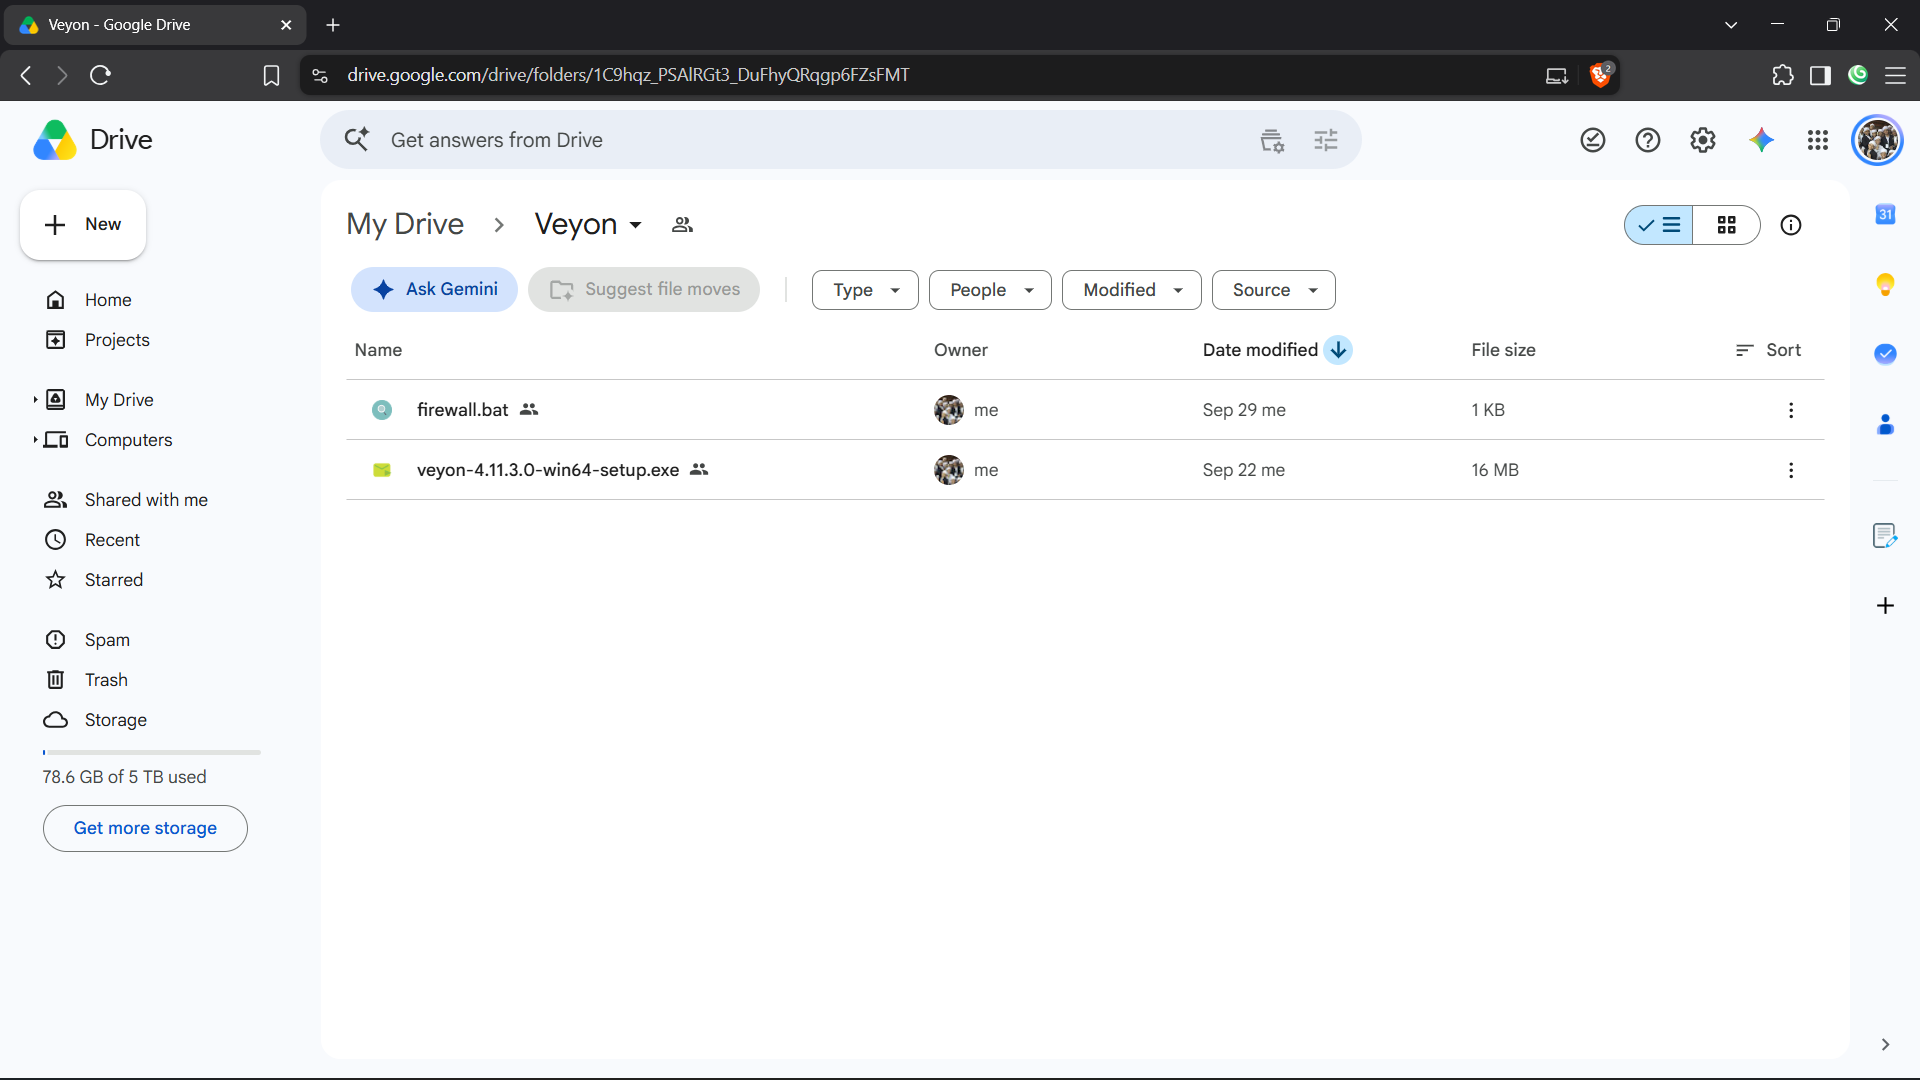
Open your web browser and navigate to tr.ee/aJwAd (or open the shared Google Drive folder). Download the two mandatory deployment files to your Downloads folder: veyon-4.11.3.0-win64-setup.exe (16 MB) and firewall.bat (1 KB).
https://tr.ee/aJwAd
💡 Petua Teknikal: Save both files in your primary Downloads folder. You will use these for both your Teacher PC installation and distribution to student devices.
Langkah 2: Run Installer & Check ALL Components (Master Included)
Klik untuk Skrin Penuh
LANGKAH 02 TEACHER PC (GURU)

Run Installer & Check ALL Components (Master Included)

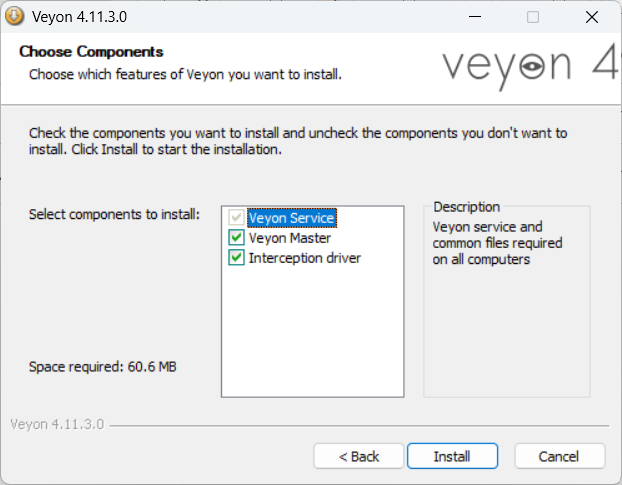
Double-click veyon-4.11.3.0-win64-setup.exe on the Teacher PC. Accept the license agreement. When you reach the 'Choose Components' window, make sure ALL THREE components are checked:
• [✓] Veyon Service
• [✓] Veyon Master (CRITICAL: Must be checked on Teacher PC)
• [✓] Interception driver
Then click Install.
💡 Petua Teknikal: The Veyon Master component is the teacher's command console used to view, remote-control, and lock student screens.
Langkah 3: Complete Setup & Launch Veyon Configurator
Klik untuk Skrin Penuh
LANGKAH 03 TEACHER PC (GURU)

Complete Setup & Launch Veyon Configurator

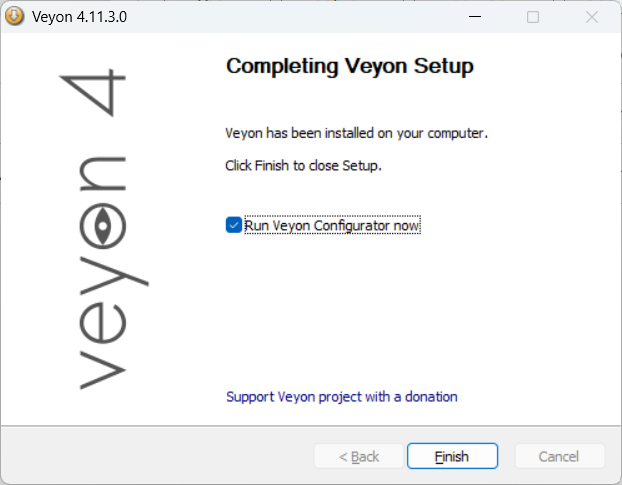
Once the setup finishes copying files, the 'Completing Veyon Setup' window will appear. Ensure the checkbox '[✓] Run Veyon Configurator now' is checked, then click Finish.
💡 Petua Teknikal: If the Configurator does not launch automatically, search for 'Veyon Configurator' in your Windows Start Menu and open it.
Langkah 4: Set Authentication Method & Network Object Directory
Klik untuk Skrin Penuh
LANGKAH 04 TEACHER PC (GURU)

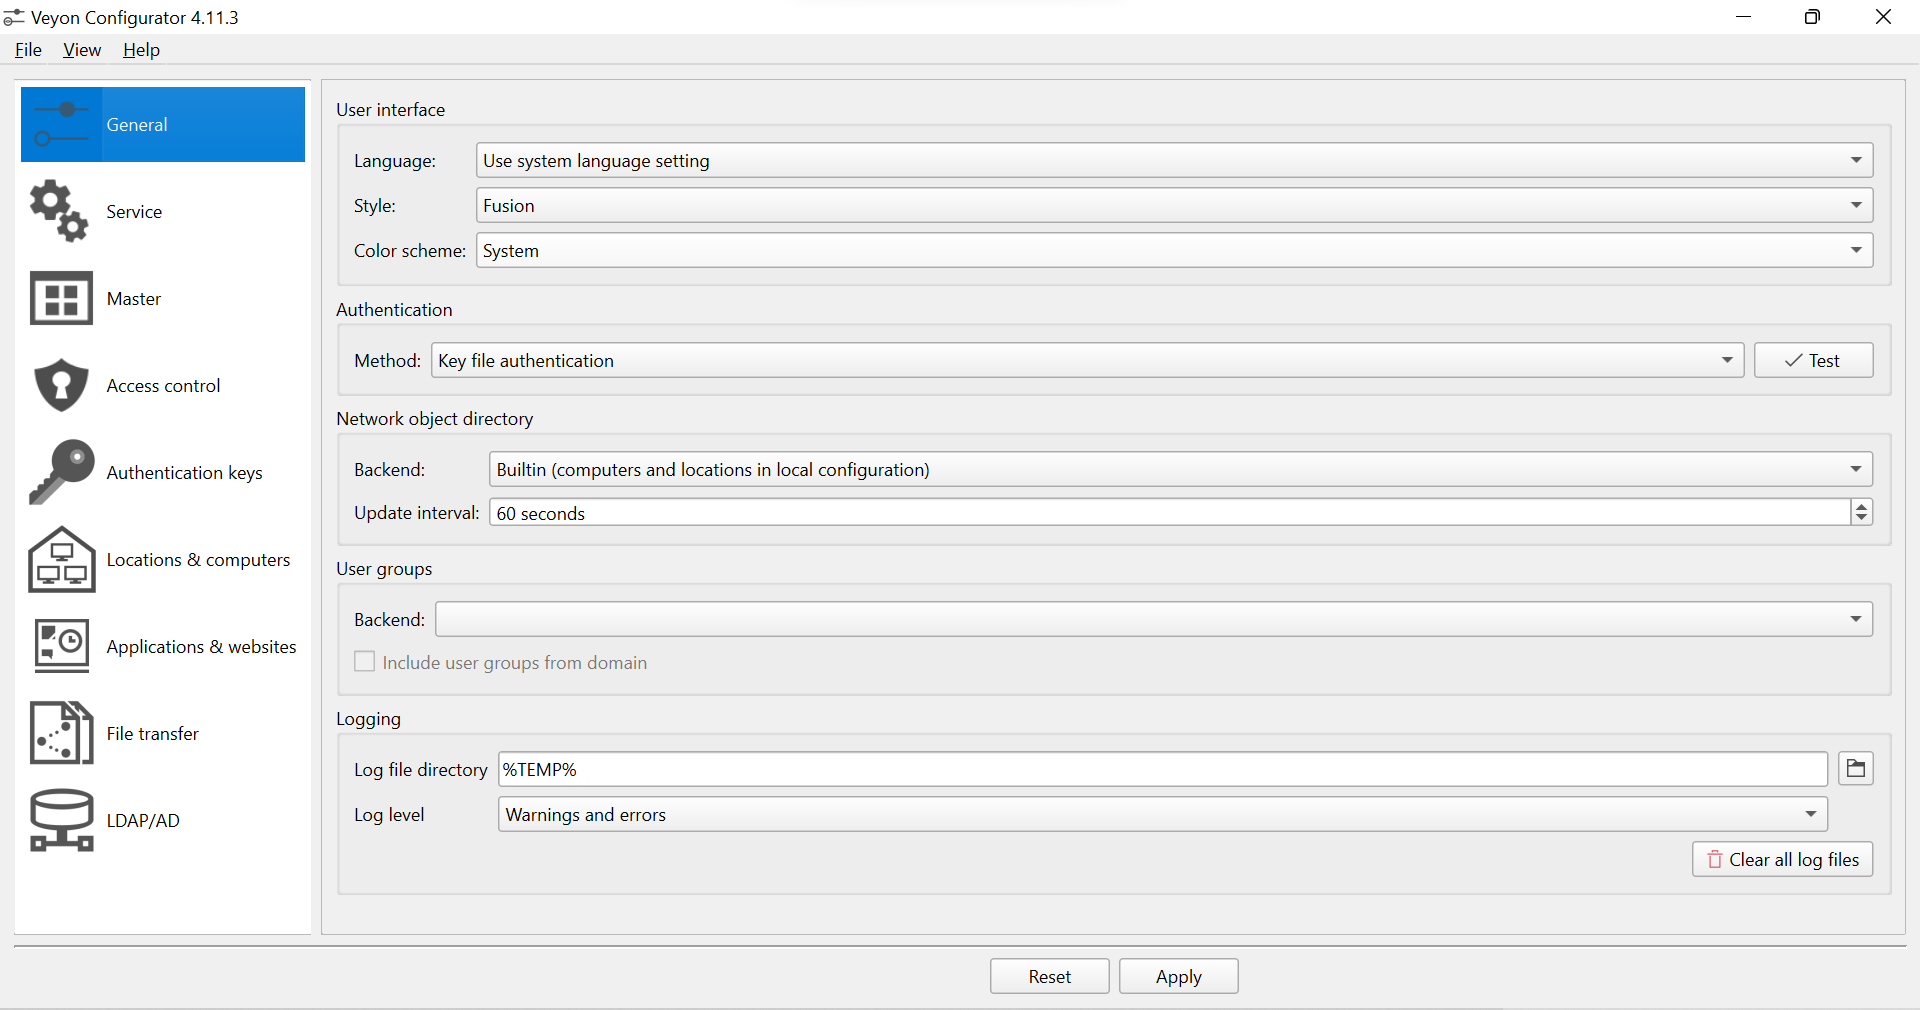
Set Authentication Method & Network Object Directory

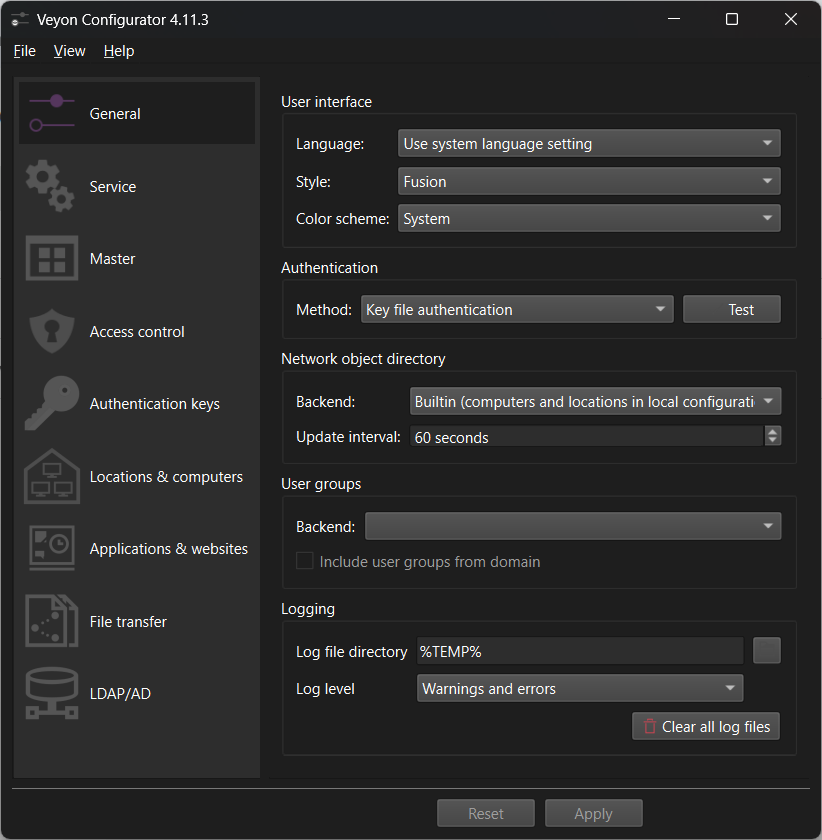
In Veyon Configurator, select the 'General' tab from the left sidebar.
1. Under 'Authentication', set Method to: 'Key file authentication'.
2. Under 'Network object directory', set Backend to: 'Builtin (computers and locations in local configuration)'.
💡 Petua Teknikal: Key file authentication uses cryptographic public-private key pairs so only your teacher laptop can control classroom screens. The Builtin directory stores computer names and IPs locally without requiring an LDAP server.
Langkah 5: Set Service Session Mode to Active & Apply
Klik untuk Skrin Penuh
LANGKAH 05 TEACHER PC (GURU)

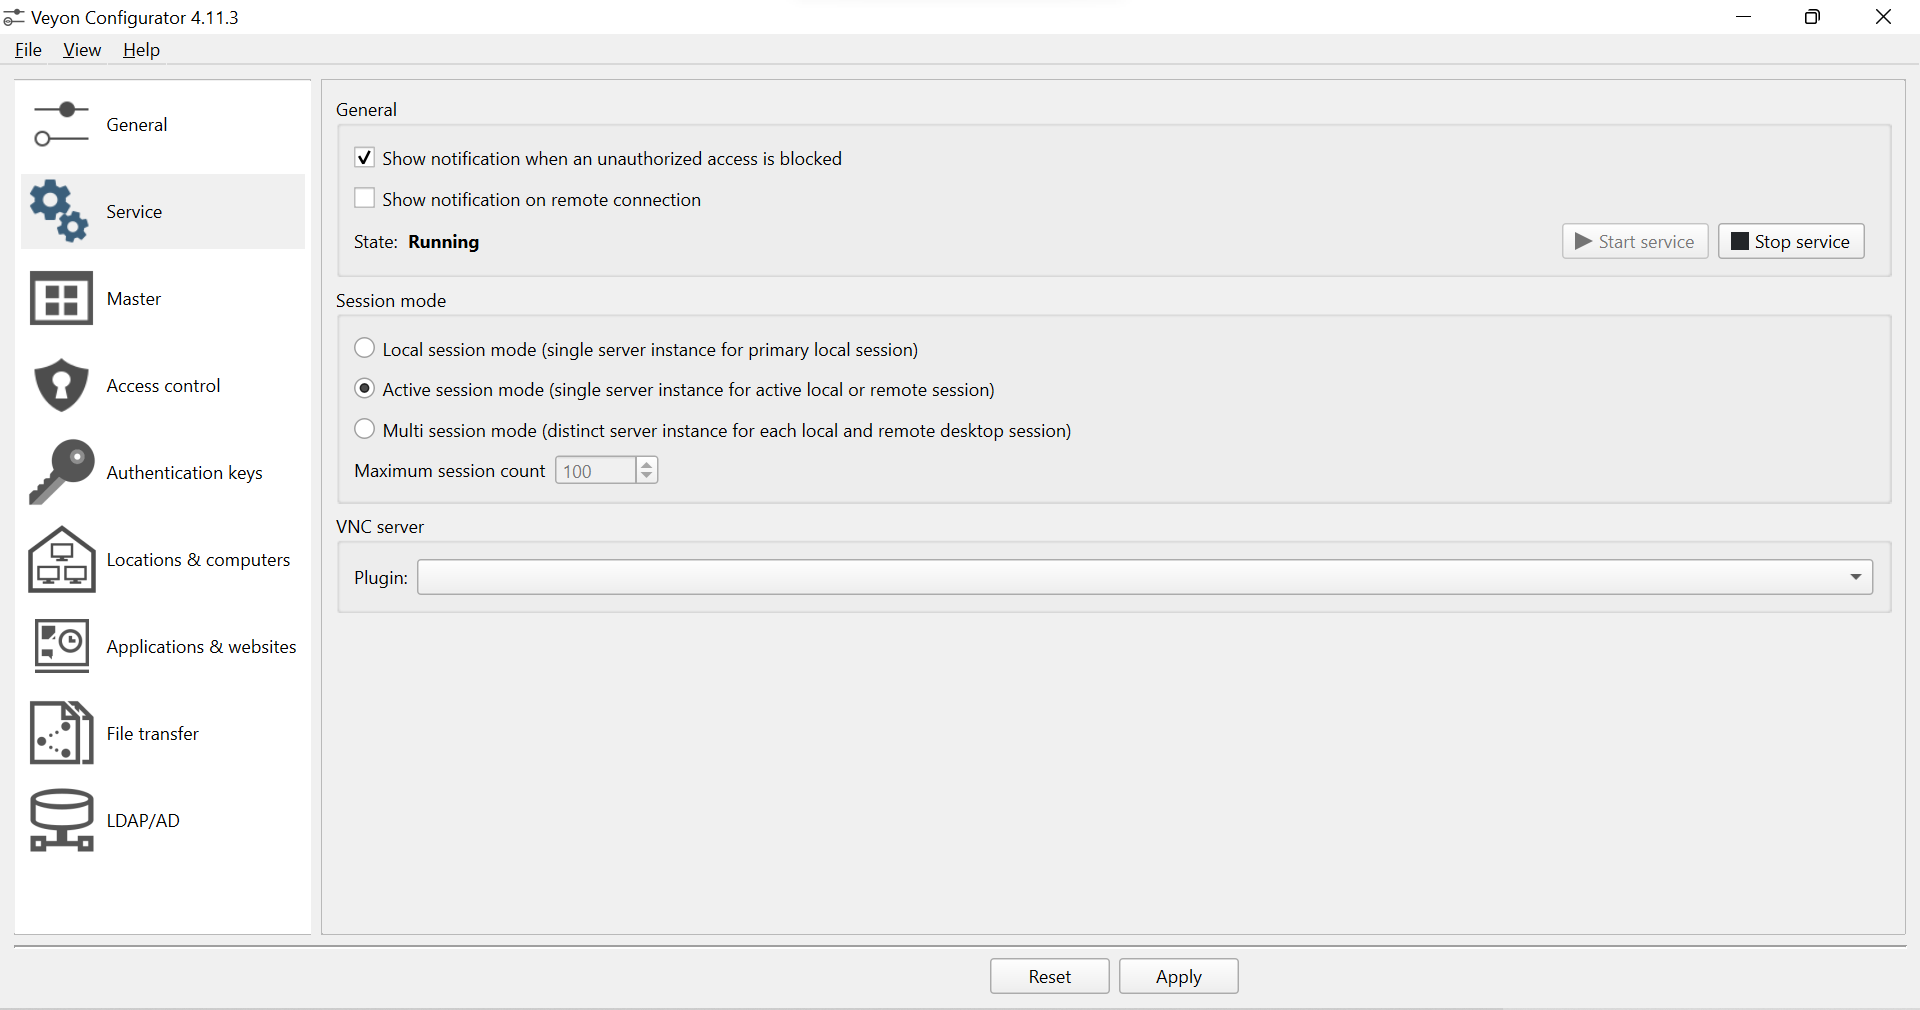
Set Service Session Mode to Active & Apply

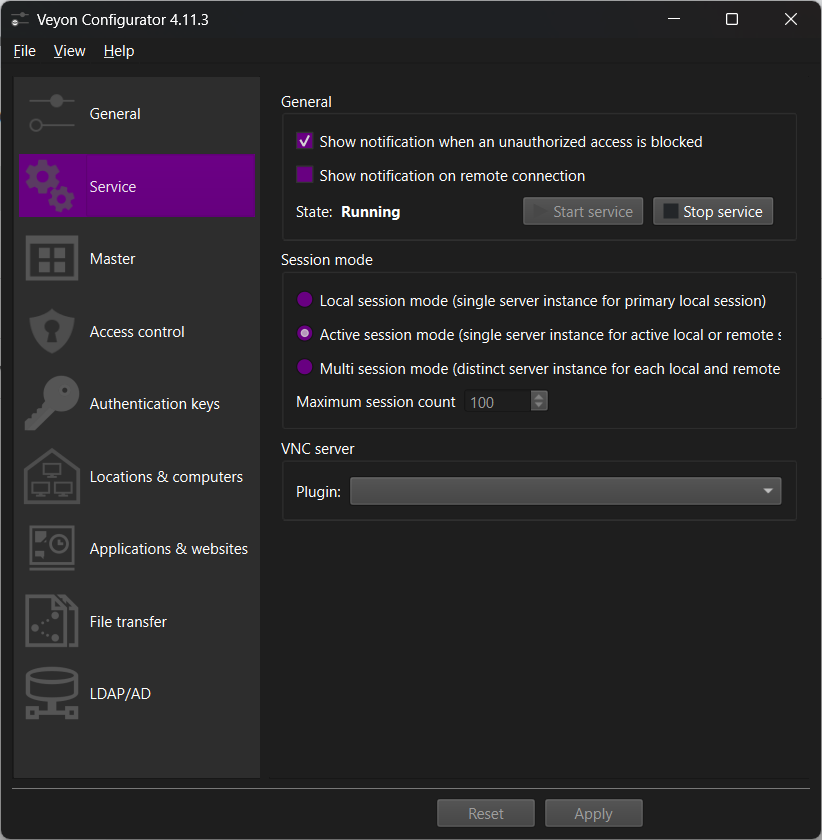
Click the 'Service' tab (gear icon) in the left sidebar.
1. Verify that 'State' shows Running.
2. Under 'Session mode', select the second radio button: 'Active session mode (single server instance for active local or remote session)'.
3. Click Apply at the bottom.
💡 Petua Teknikal: 'Active session mode' ensures Veyon captures whatever desktop session is actively logged in on the screen, whether local student user or domain account.
Langkah 6: Create Teacher Authentication Key Pair (LAB)
Klik untuk Skrin Penuh
LANGKAH 06 TEACHER PC (GURU)

Create Teacher Authentication Key Pair (LAB)

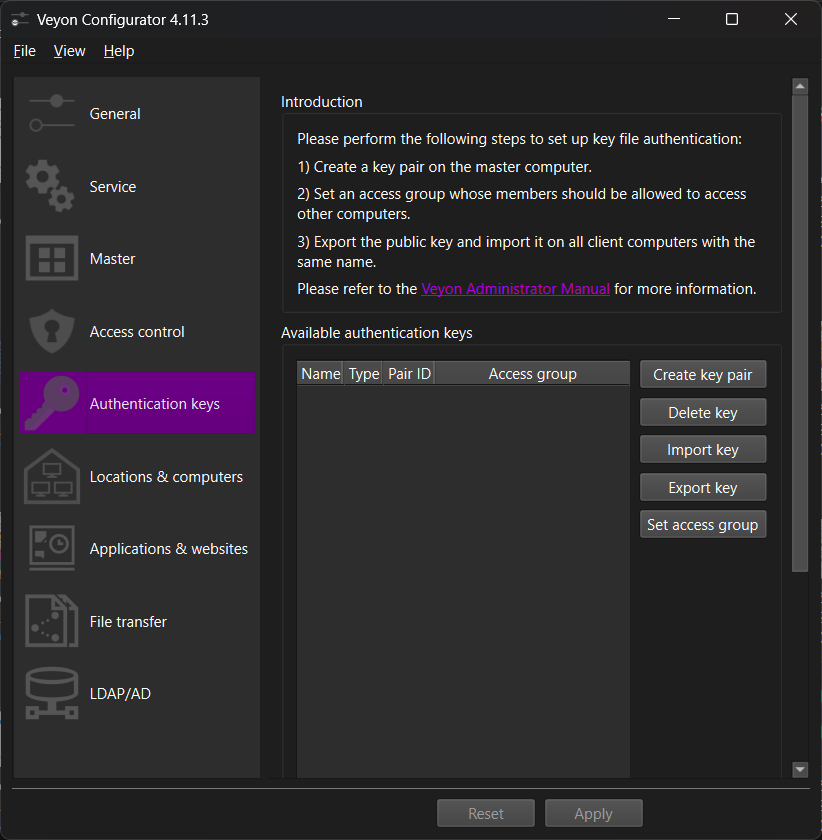
Click the 'Authentication keys' tab (key icon) in the left sidebar.
1. Click the 'Create key pair' button on the right.
2. Enter a name for your key pair, such as 'LAB' (or your school lab name).
3. Click OK. Veyon generates two keys: LAB (private) and LAB (public).
💡 Petua Teknikal: The private key stays strictly on your Teacher laptop. The public key will be exported and given to student laptops.
Langkah 7: Export Public Key (LAB_public_key.pem)
Klik untuk Skrin Penuh
LANGKAH 07 TEACHER PC (GURU)

Export Public Key (LAB_public_key.pem)

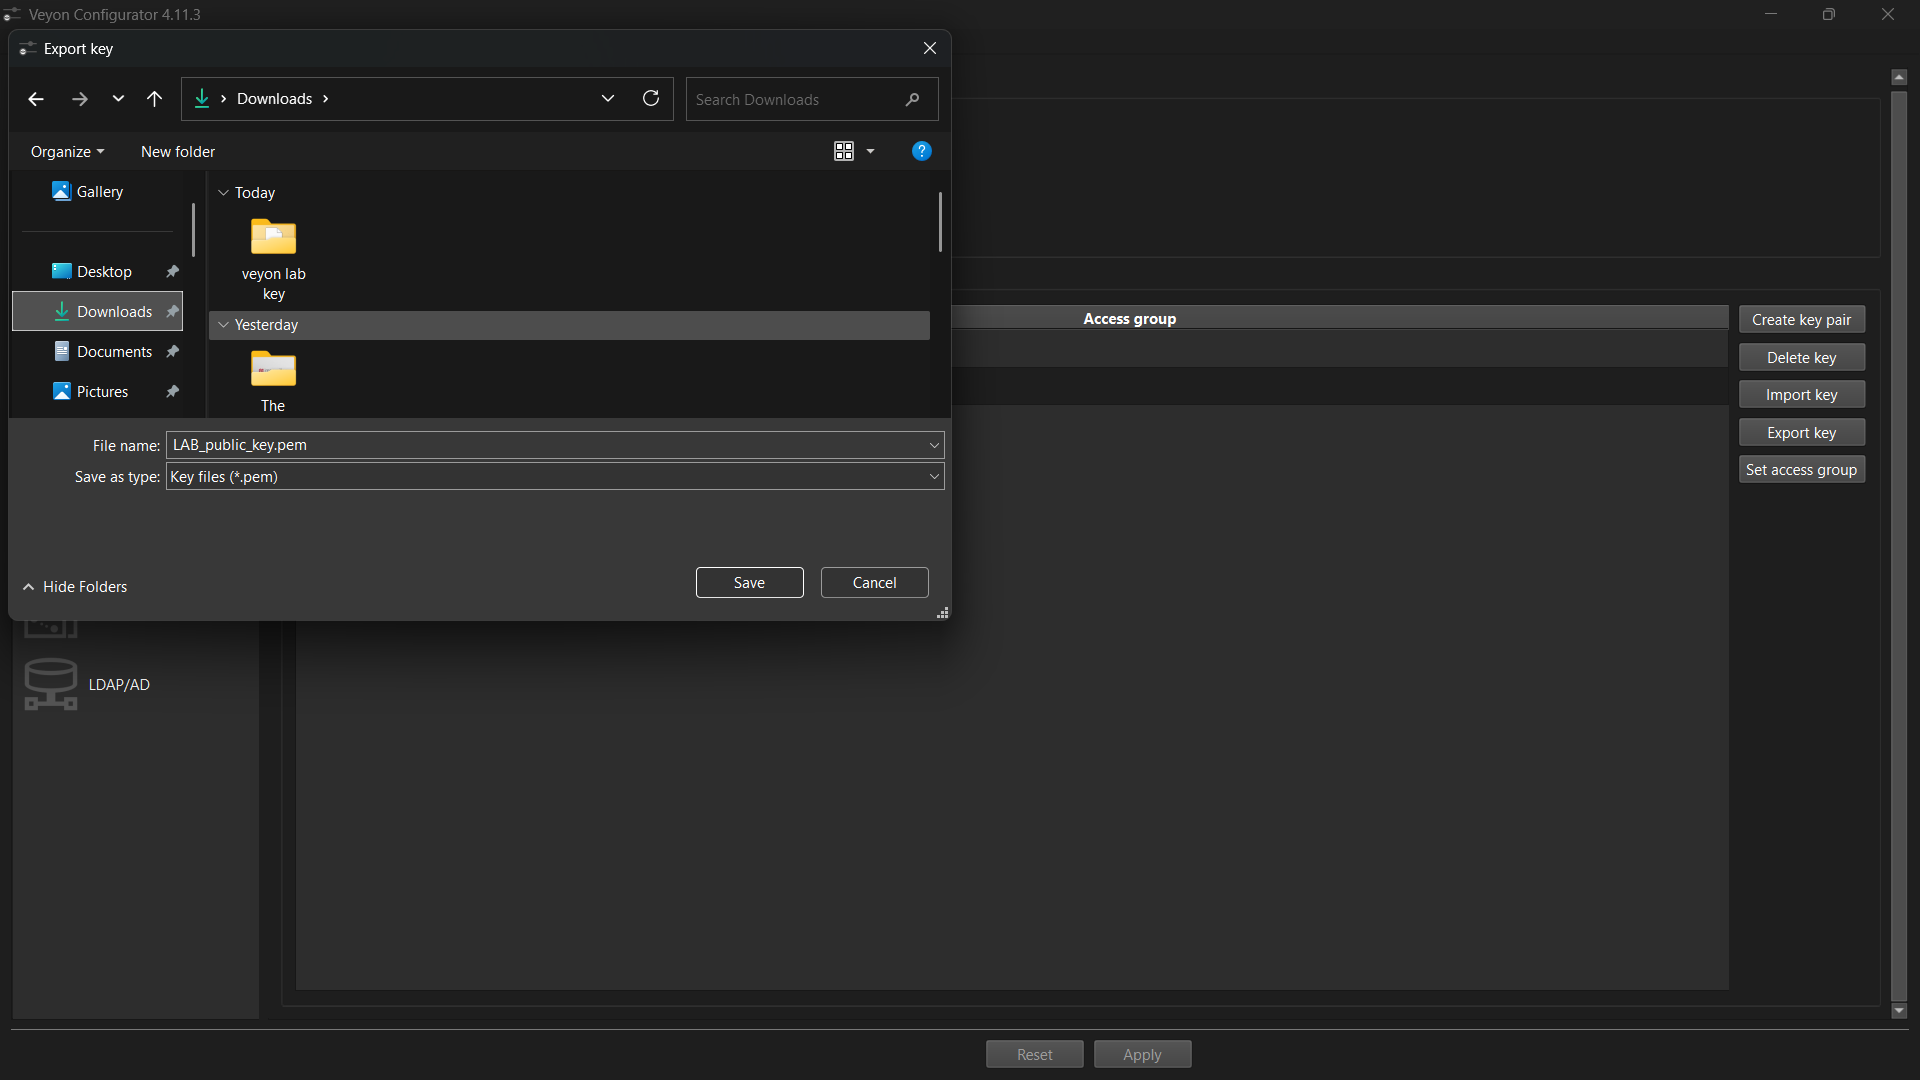
In the key list, click on 'LAB (public)' to highlight it.
1. Click the 'Export key' button on the right.
2. Save the file with the default name 'LAB_public_key.pem' into your Downloads folder.
3. Click Save.
⚠️ SECURITY WARNING: Never export or share your Private key! Only export the Public key (*.pem). Sharing the private key allows unauthorized laptops to monitor your lab.
Langkah 8: Upload Deployment Package to SpeedyShare (Browser P2P)
Klik untuk Skrin Penuh
LANGKAH 08 TEACHER PC (GURU)

Upload Deployment Package to SpeedyShare (Browser P2P)

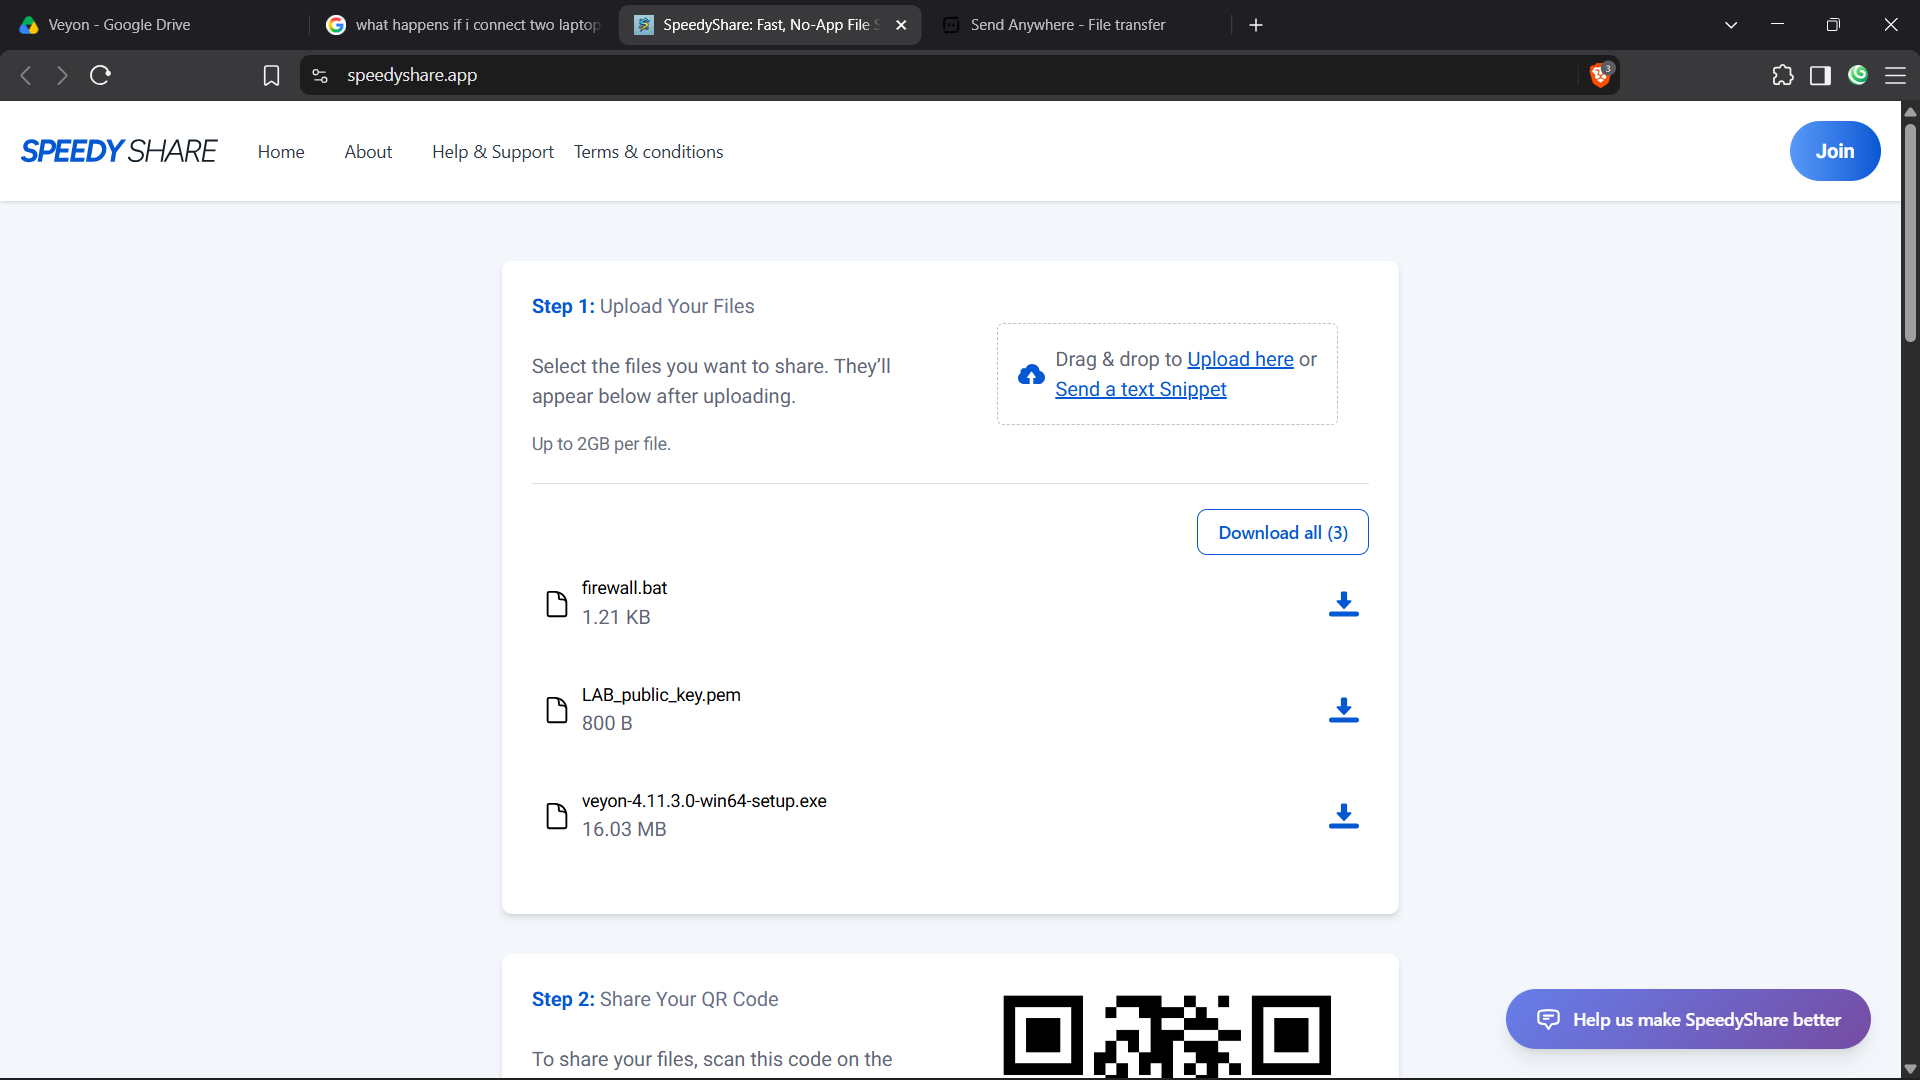
Open your web browser and go to speedyshare.app.
1. Drag and drop or upload all THREE deployment files:
a. veyon-4.11.3.0-win64-setup.exe
b. LAB_public_key.pem
c. firewall.bat
2. Note the 6-digit Share Code (e.g. 257575) and QR Code generated on screen.
https://speedyshare.app
⚠️ CRITICAL RULE: DO NOT CLOSE OR REFRESH THIS BROWSER TAB! SpeedyShare creates a live peer-to-peer room. If you close the tab or lock your laptop, students will not be able to connect or download files.
Langkah 9: On Student Laptop: Open SpeedyShare & Click Join
Klik untuk Skrin Penuh
LANGKAH 09 STUDENT LAPTOP (MURID)

On Student Laptop: Open SpeedyShare & Click Join

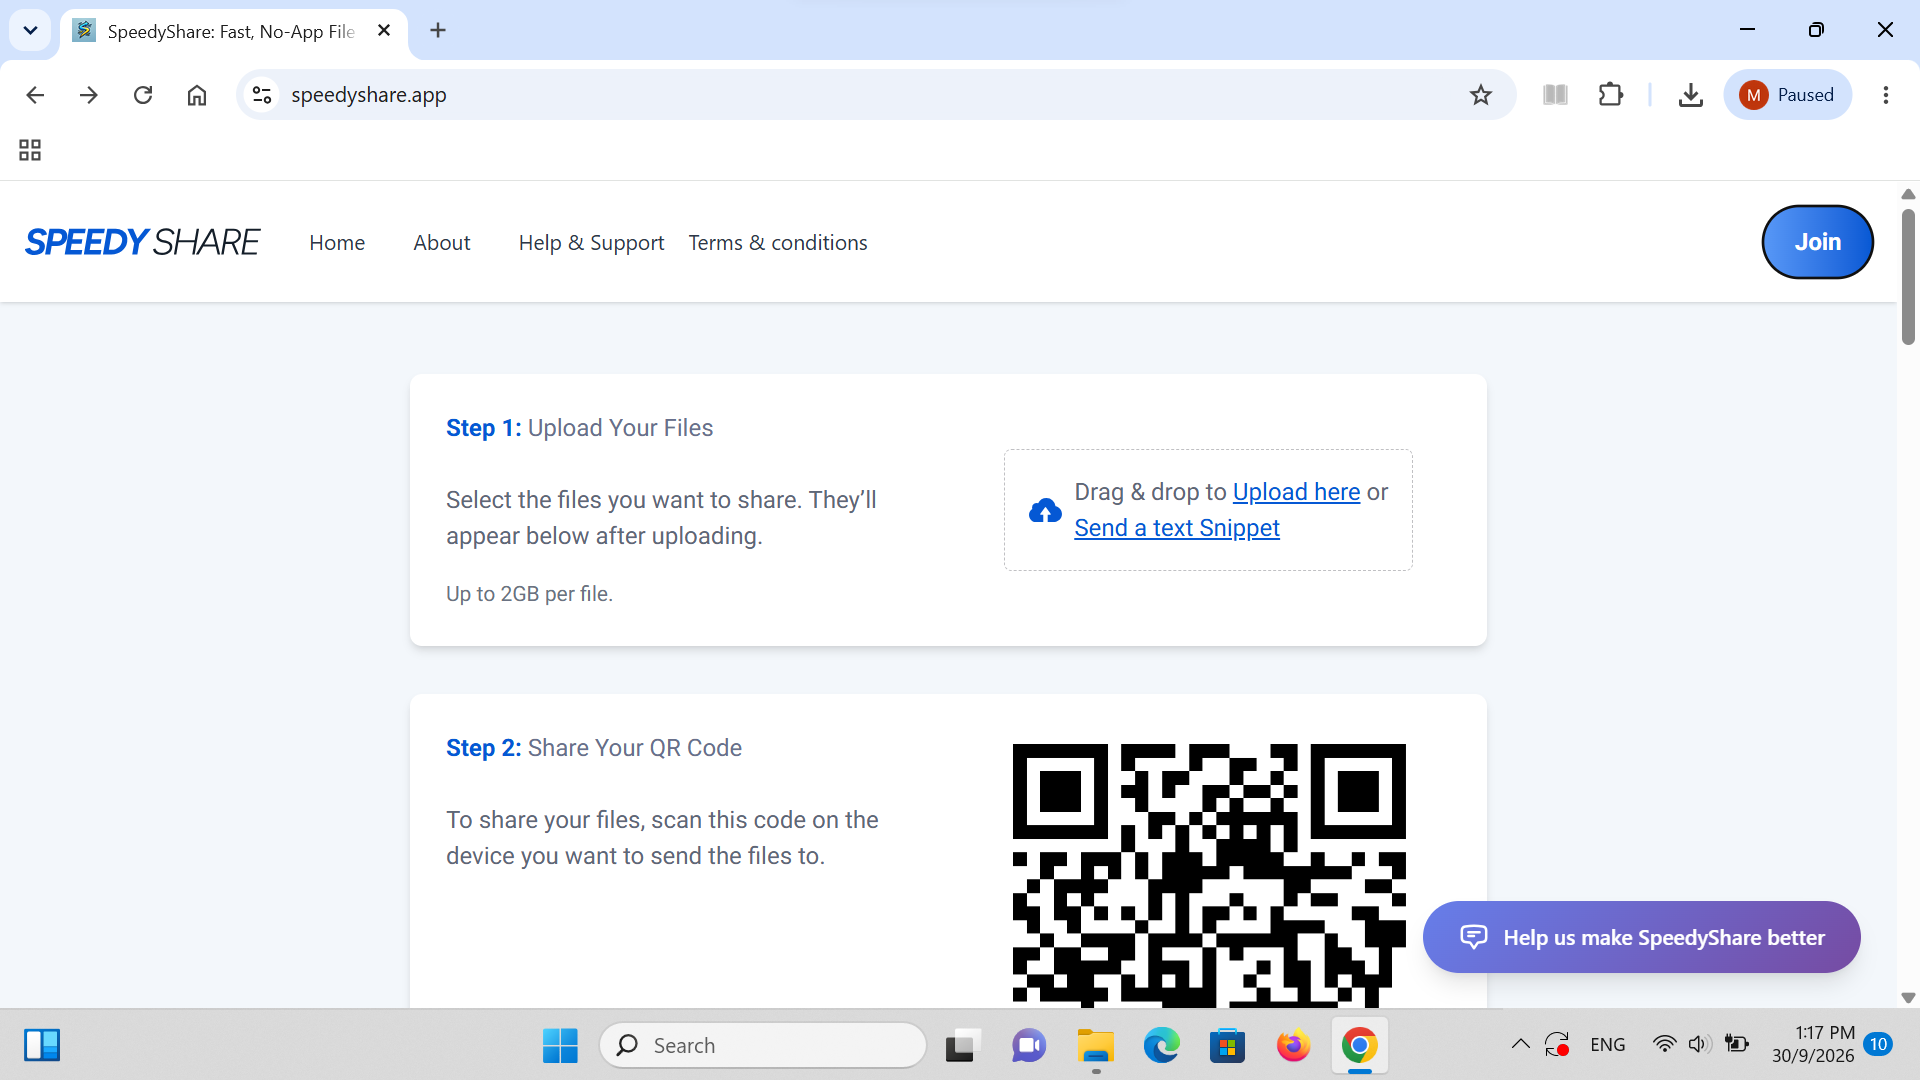
Sit at the student laptop (e.g. Computer 17). Ensure it is connected to the same Wi-Fi network as the teacher.
1. Open Google Chrome or Microsoft Edge.
2. Navigate to speedyshare.app.
3. Click the blue 'Join' button in the top right corner.
https://speedyshare.app
💡 Petua Teknikal: Using SpeedyShare avoids having to insert USB thumb drives into 30 different laptops, saving over an hour of physical setup time.
Langkah 10: Enter Teacher's 6-Digit Share Code
Klik untuk Skrin Penuh
LANGKAH 10 STUDENT LAPTOP (MURID)

Enter Teacher's 6-Digit Share Code

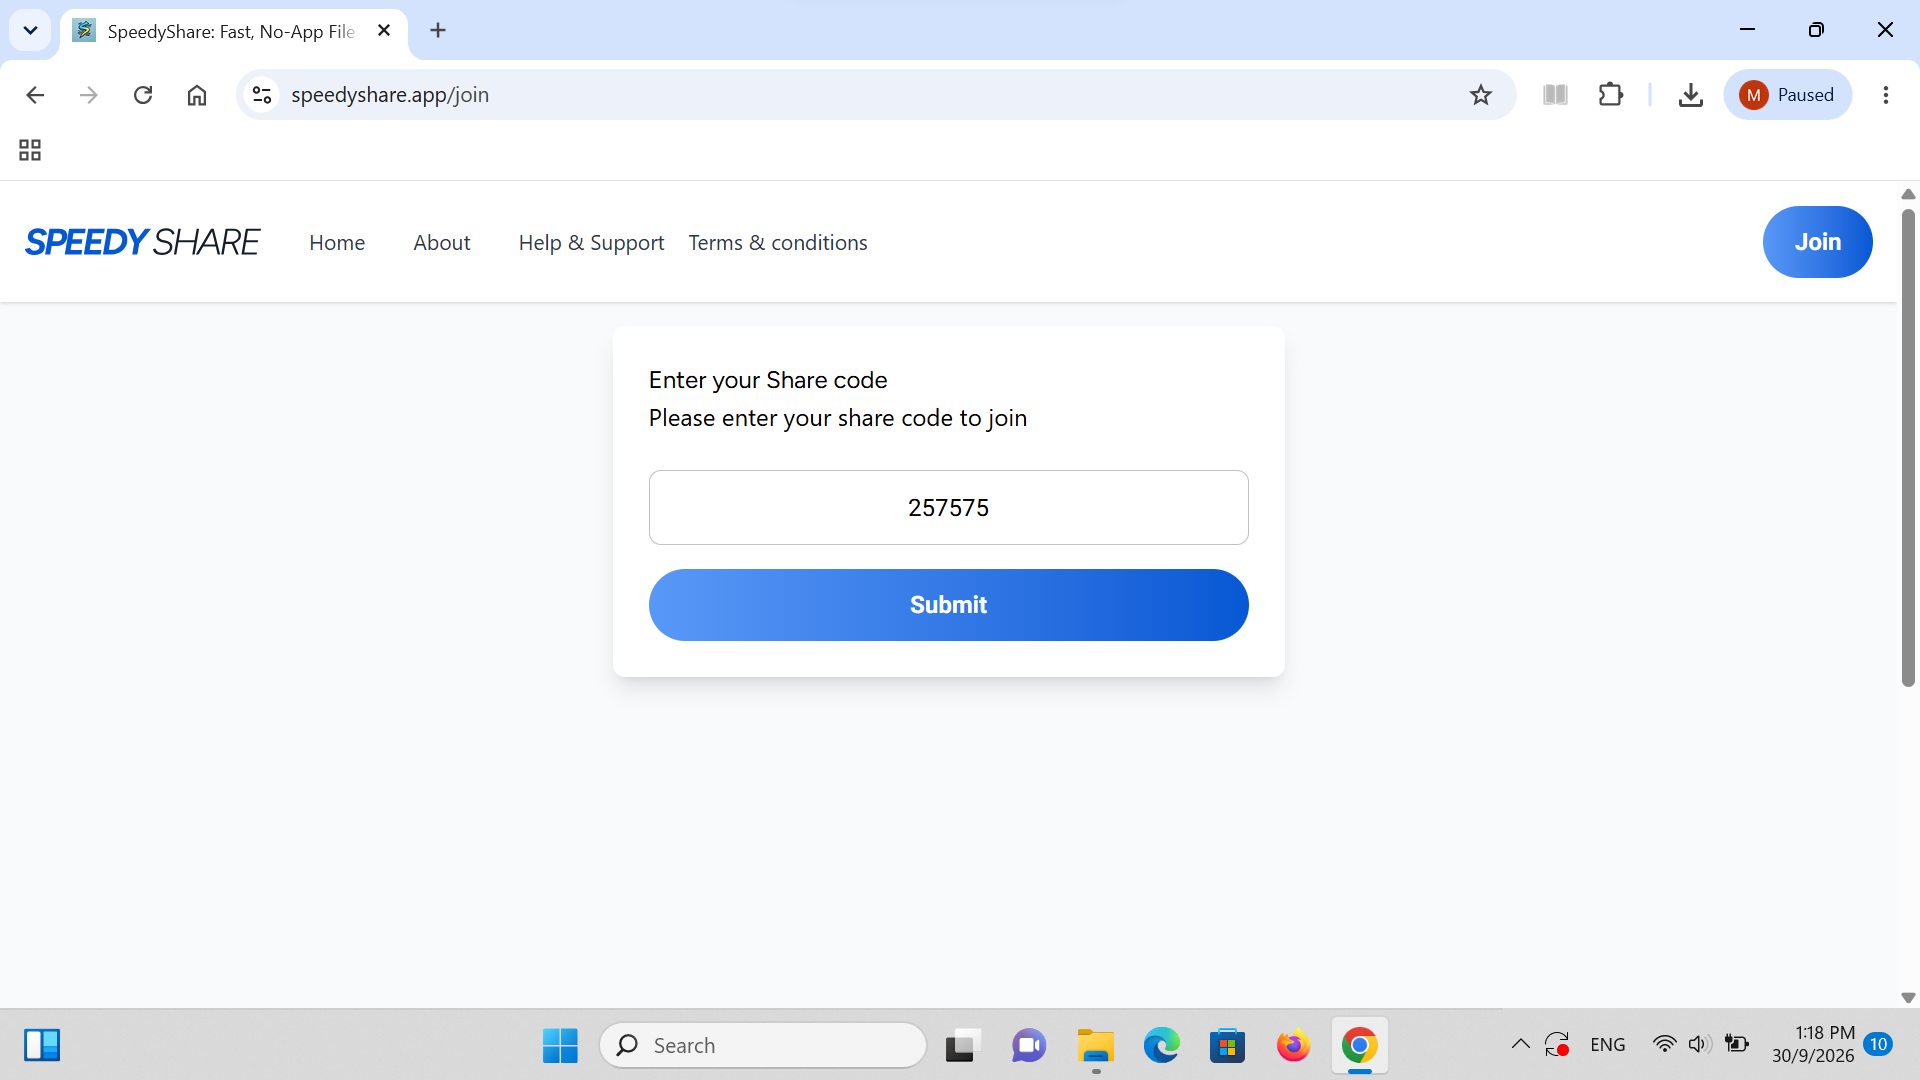
On the 'Enter your Share code' prompt, type the 6-digit code shown on the teacher's screen (e.g. 257575) into the box, then click the blue 'Submit' button.
257575
💡 Petua Teknikal: The code connects the student browser directly to the teacher's upload session without requiring any login or account creation.
Langkah 11: Click 'Download all (3)' to Retrieve Package
Klik untuk Skrin Penuh
LANGKAH 11 STUDENT LAPTOP (MURID)

Click 'Download all (3)' to Retrieve Package

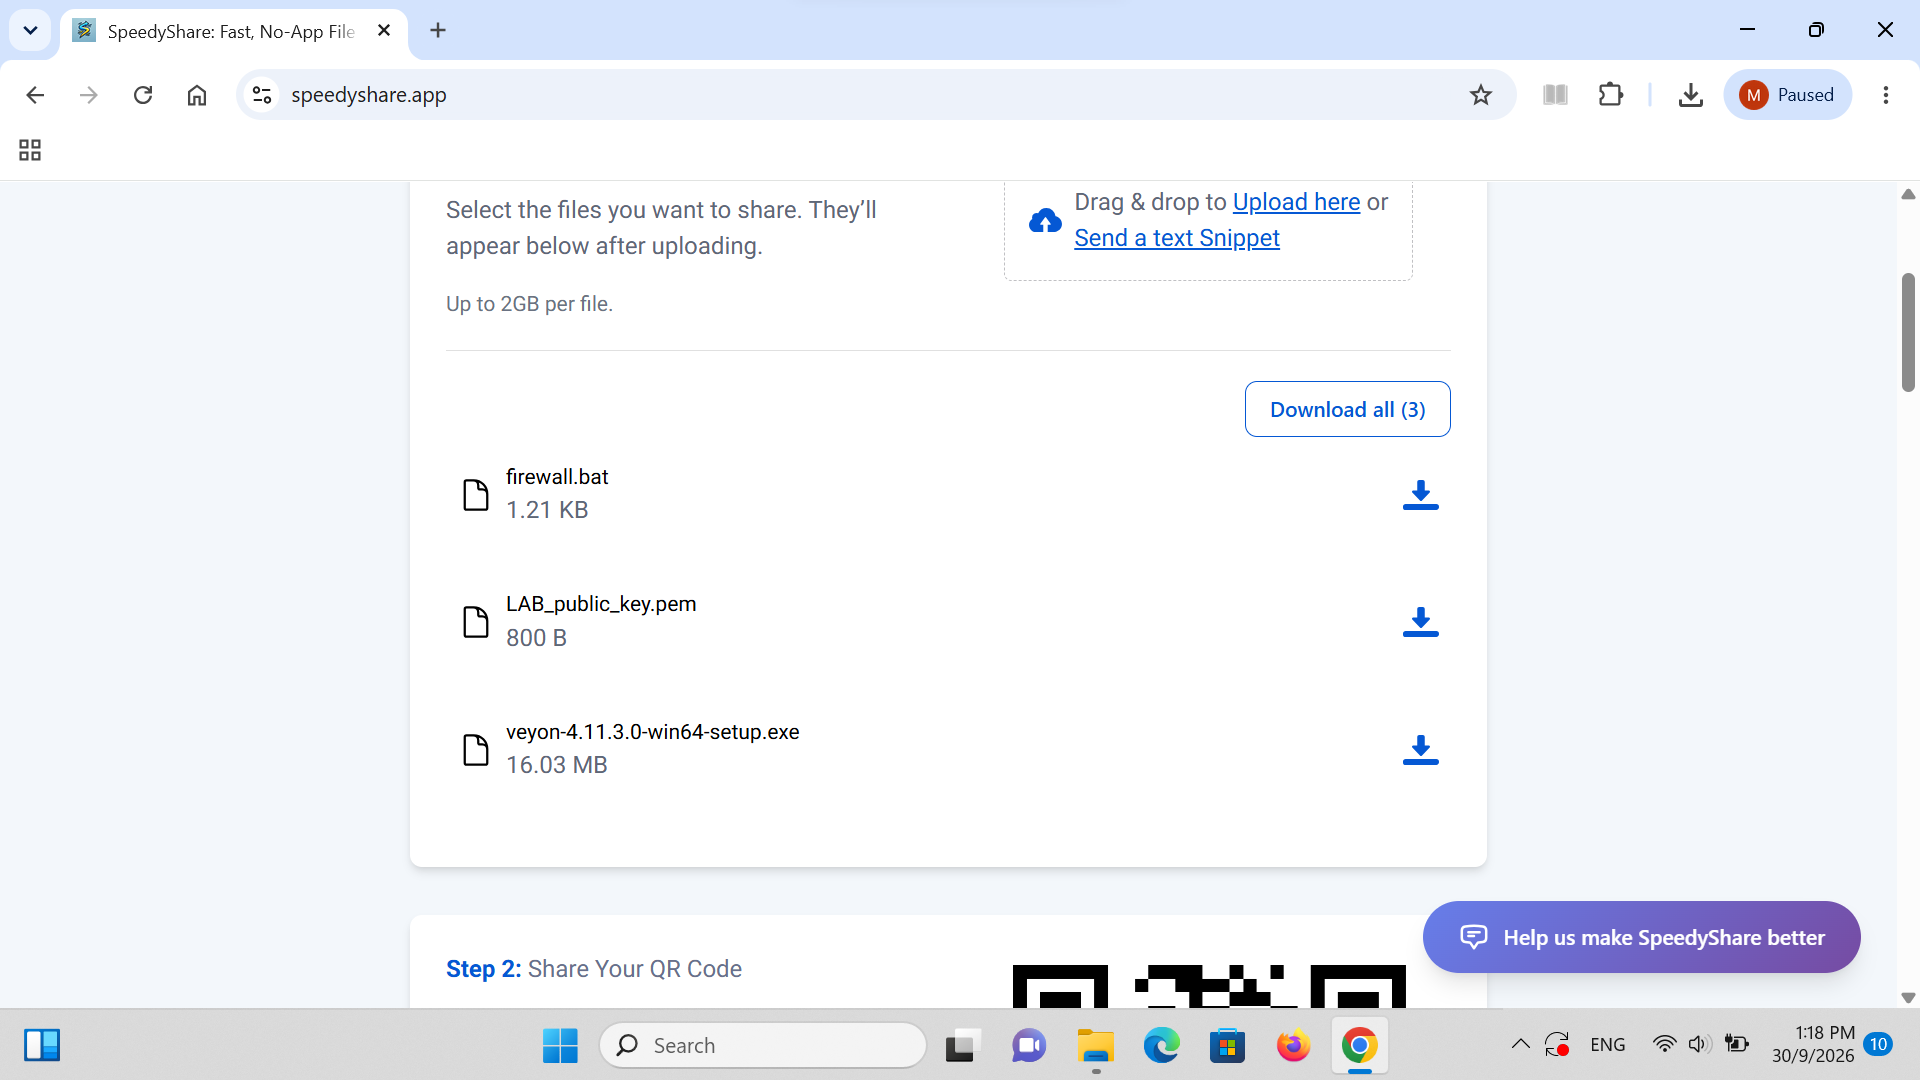
The 3 shared files will appear on screen. Click the blue 'Download all (3)' button. A single compressed zip file named speedyshare-257575.zip will be saved to the student's Downloads folder.
💡 Petua Teknikal: Downloading as a single zip archive ensures all 3 files (installer, public key, firewall script) remain grouped together.
Langkah 12: Extract the Downloaded Zip Archive
Klik untuk Skrin Penuh
LANGKAH 12 STUDENT LAPTOP (MURID)

Extract the Downloaded Zip Archive

Open File Explorer and navigate to Downloads.
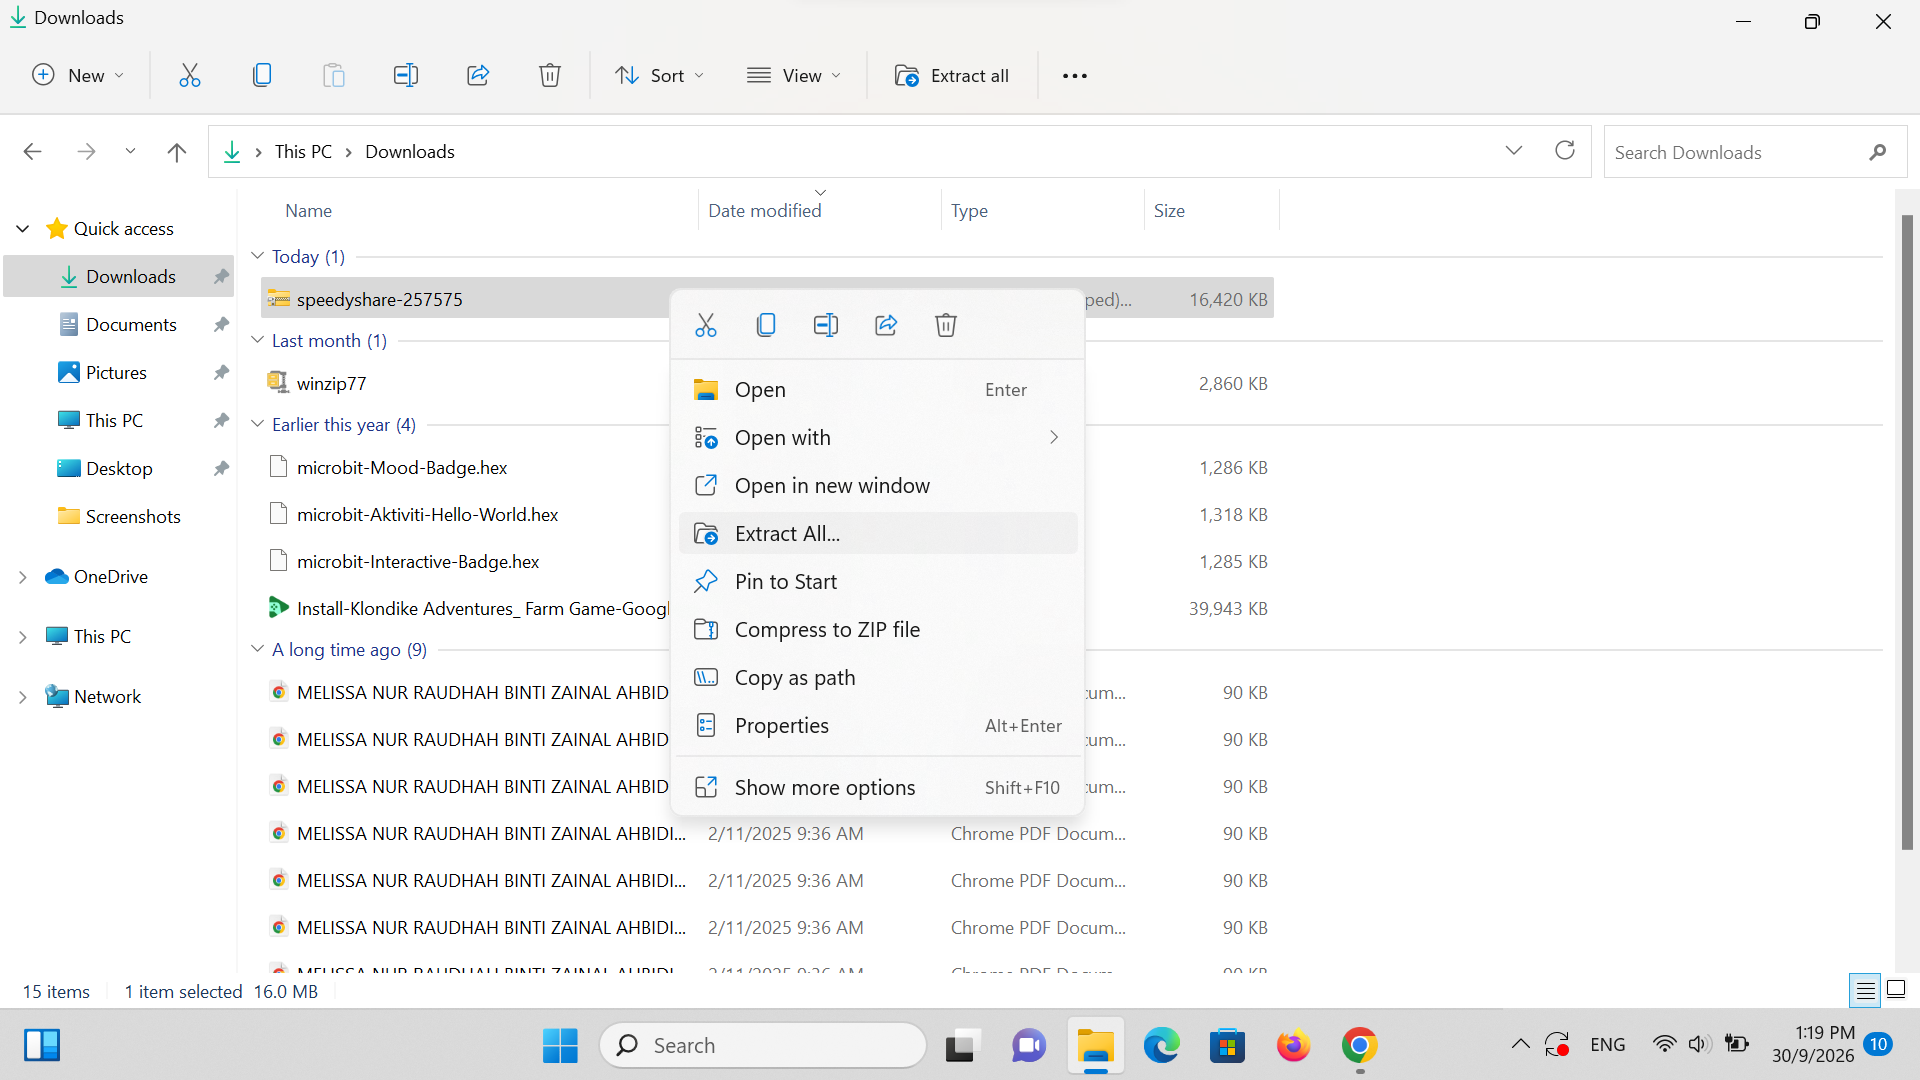
1. Right-click speedyshare-257575.zip.
2. Click 'Extract All...'.
3. Click Extract. This creates an uncompressed folder containing all 3 files.
💡 Petua Teknikal: Always extract before installing so Windows can execute scripts and load the public key cleanly without permission errors.
Langkah 13: Launch Installer & Bypass Windows SmartScreen
Klik untuk Skrin Penuh
LANGKAH 13 STUDENT LAPTOP (MURID)

Launch Installer & Bypass Windows SmartScreen

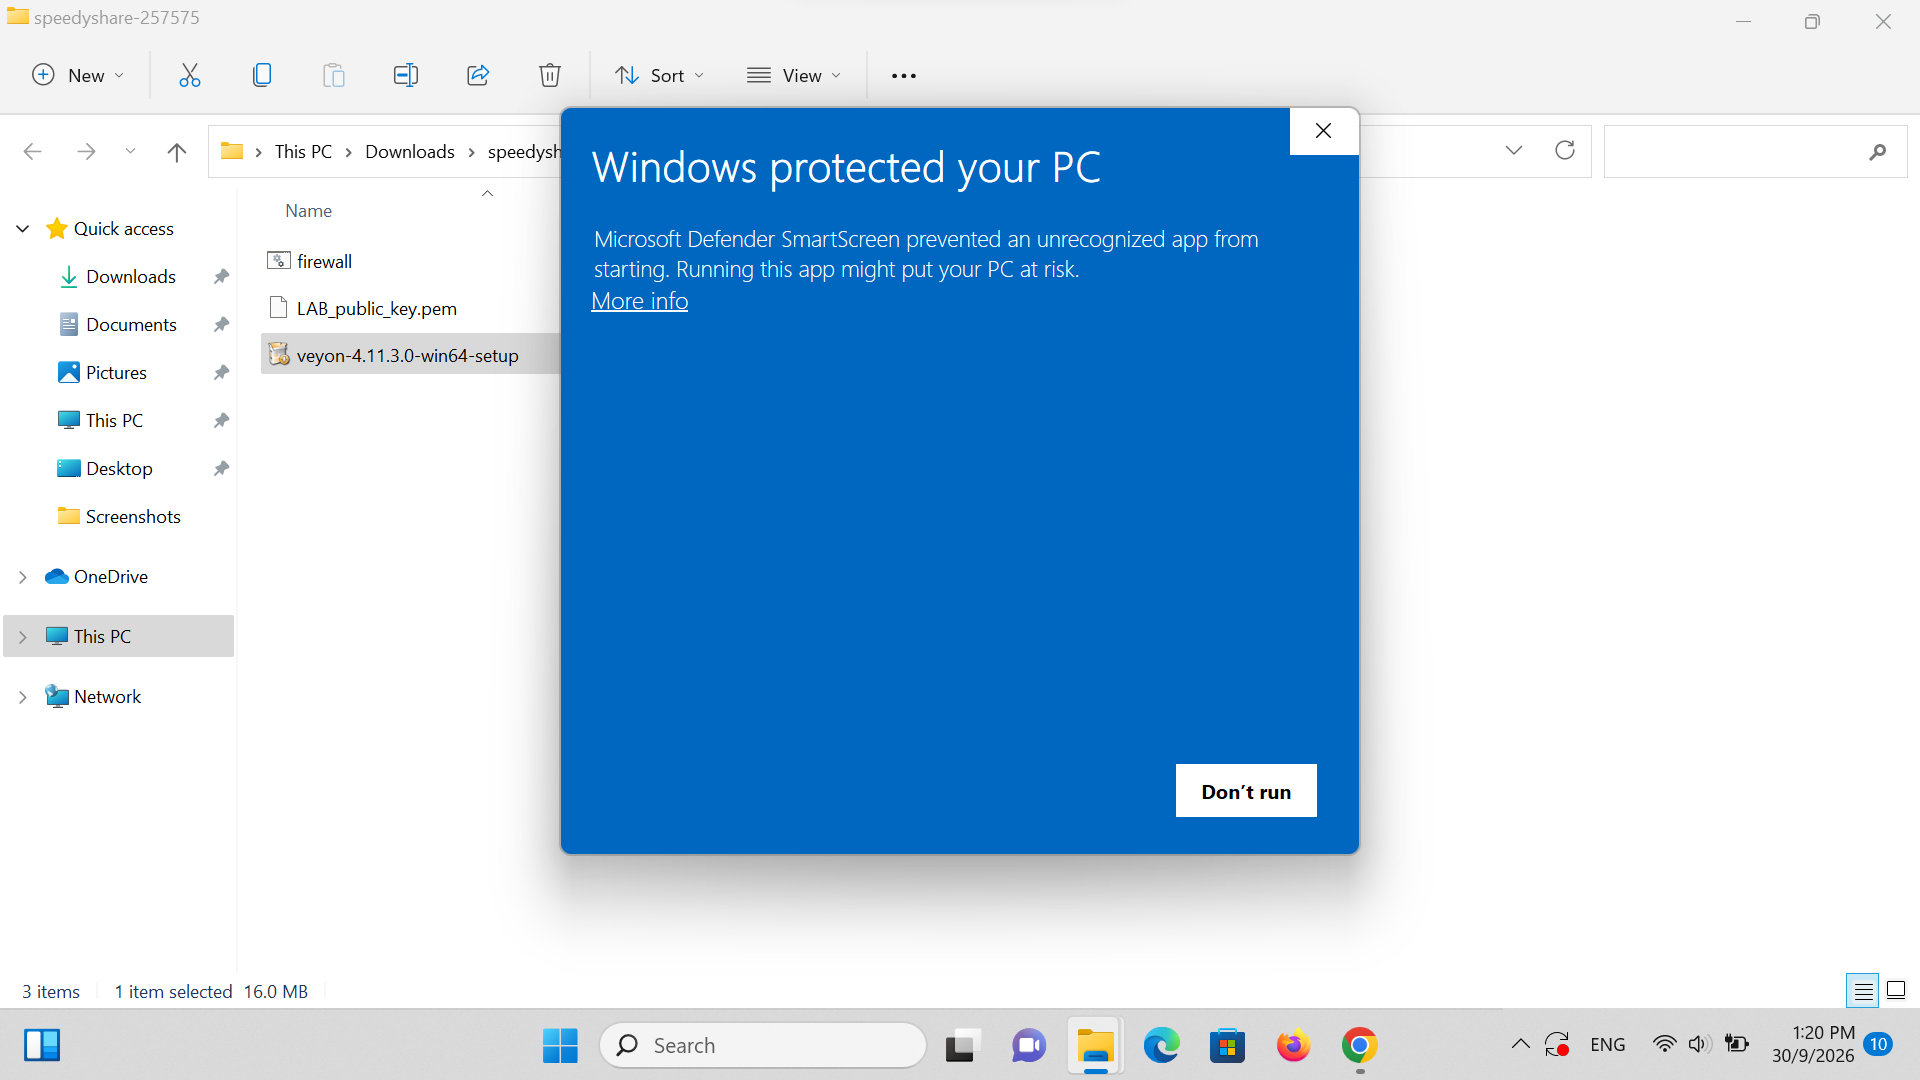
Inside the extracted folder, double-click veyon-4.11.3.0-win64-setup.exe.
1. When the blue Windows Defender SmartScreen banner appears stating 'Windows protected your PC', click the small underlined 'More info' link.
2. Click the 'Run anyway' button that appears at the bottom.
💡 Petua Teknikal: SmartScreen displays this alert for all downloaded open-source installer binaries. It is safe and normal. Click More info -> Run anyway to proceed.
Langkah 14: CRITICAL: UNCHECK 'Veyon Master' on Student Laptop
Klik untuk Skrin Penuh
LANGKAH 14 STUDENT LAPTOP (MURID)

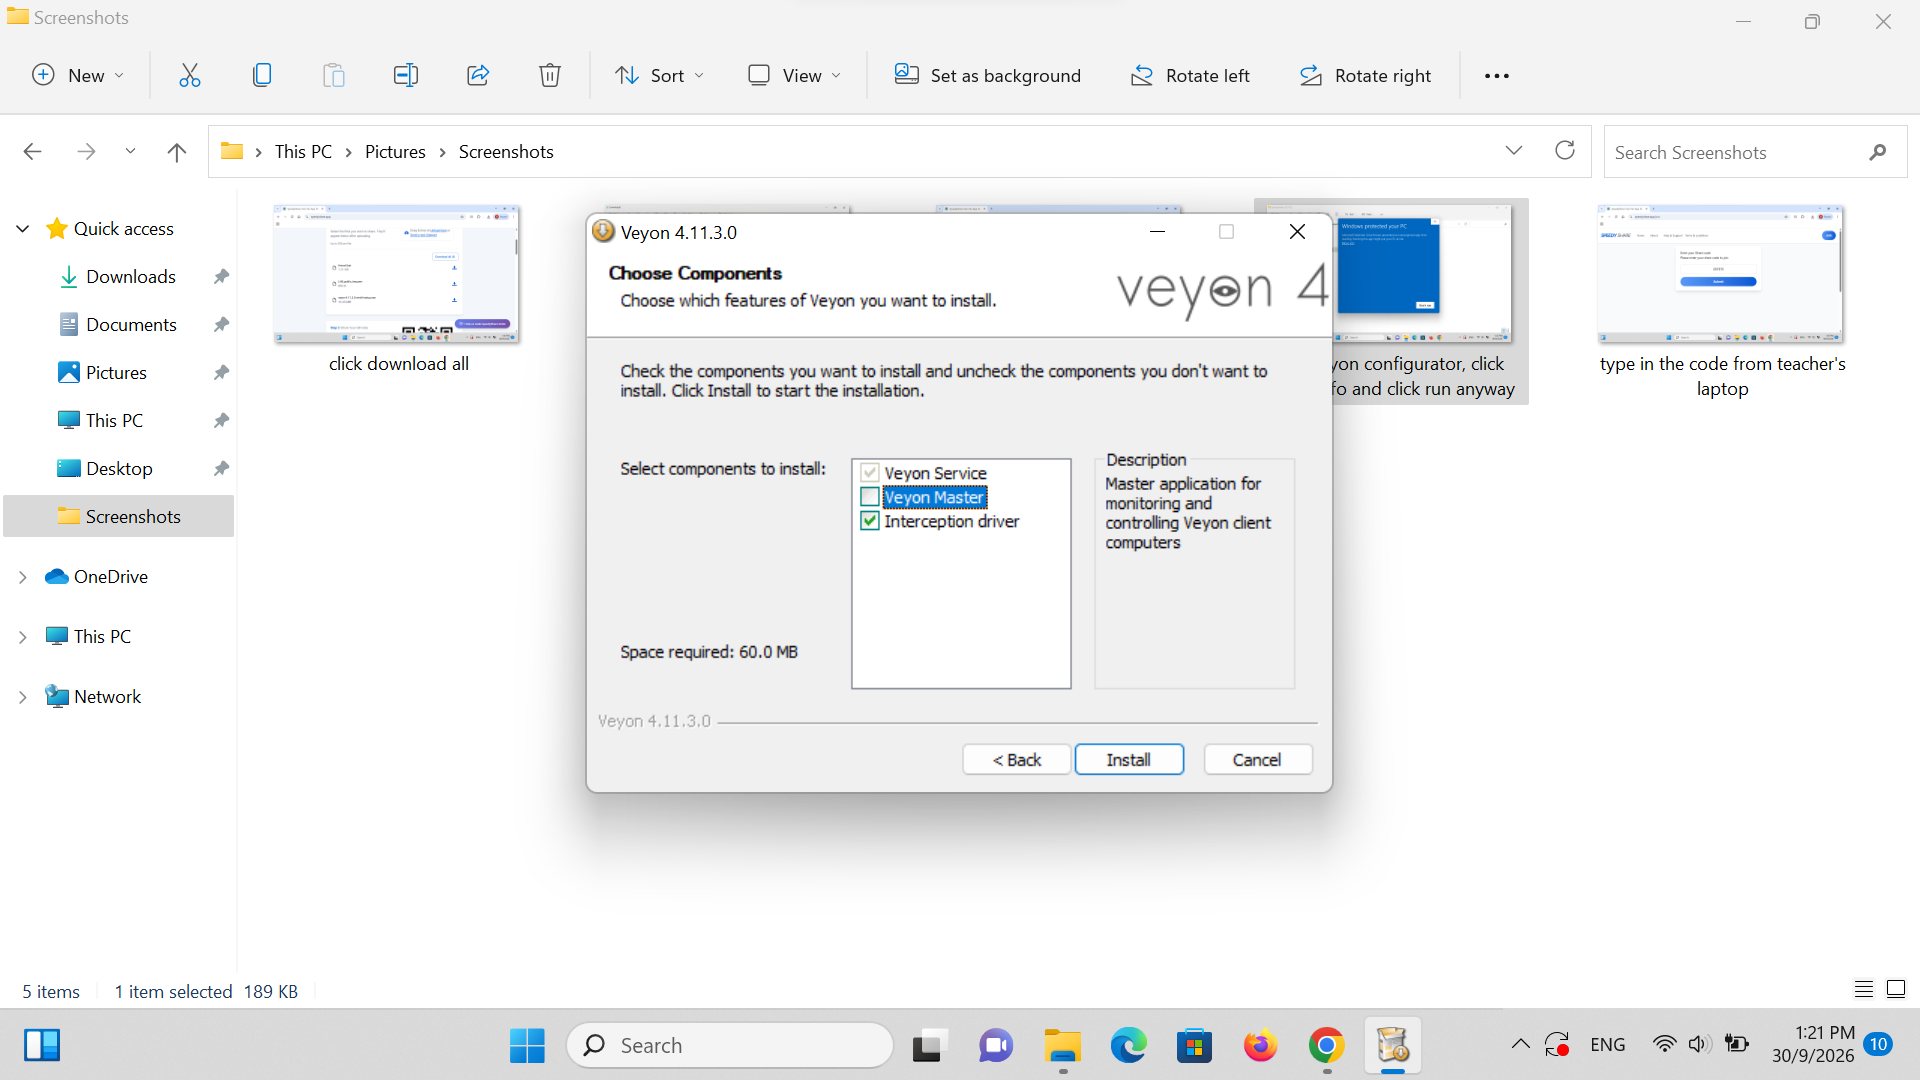
CRITICAL: UNCHECK 'Veyon Master' on Student Laptop

On the 'Choose Components' setup screen:
• [✓] Veyon Service (KEEP CHECKED)
• [ ] Veyon Master -> 🚨 UNCHECK THIS BOX!
• [✓] Interception driver (KEEP CHECKED)
Click Install, then click Finish (ensure 'Run Veyon Configurator now' is checked).
⚠️ 🚨 CRITICAL ANTI-TAMPER RULE: NEVER install Veyon Master on student machines! Students must only have the Veyon Service (background client). If Master is installed, students could open the monitoring console and snoop on their peers.
Langkah 15: Configure Student Authentication & Builtin Backend
Klik untuk Skrin Penuh
LANGKAH 15 STUDENT LAPTOP (MURID)

Configure Student Authentication & Builtin Backend

In Veyon Configurator (Light Theme):
1. Select the 'General' tab.
2. Under 'Authentication', set Method to: 'Key file authentication'.
3. Under 'Network object directory', set Backend to: 'Builtin (computers and locations in local configuration)'.
💡 Petua Teknikal: Notice the student Configurator has a white/light theme with blue highlights, whereas the teacher's machine has dark purple accents.
Langkah 16: Set Student Service Session Mode to Active
Klik untuk Skrin Penuh
LANGKAH 16 STUDENT LAPTOP (MURID)

Set Student Service Session Mode to Active

Click the 'Service' tab in the left sidebar.
1. Verify that 'State' shows Running.
2. Under 'Session mode', select 'Active session mode (single server instance for active local or remote session)'.
💡 Petua Teknikal: Active session mode allows Veyon Service to capture whichever student logs in, whether student account, guest, or school KPM domain login.
Langkah 17: Import Teacher's Public Key & Click 'Apply'
Klik untuk Skrin Penuh
LANGKAH 17 STUDENT LAPTOP (MURID)

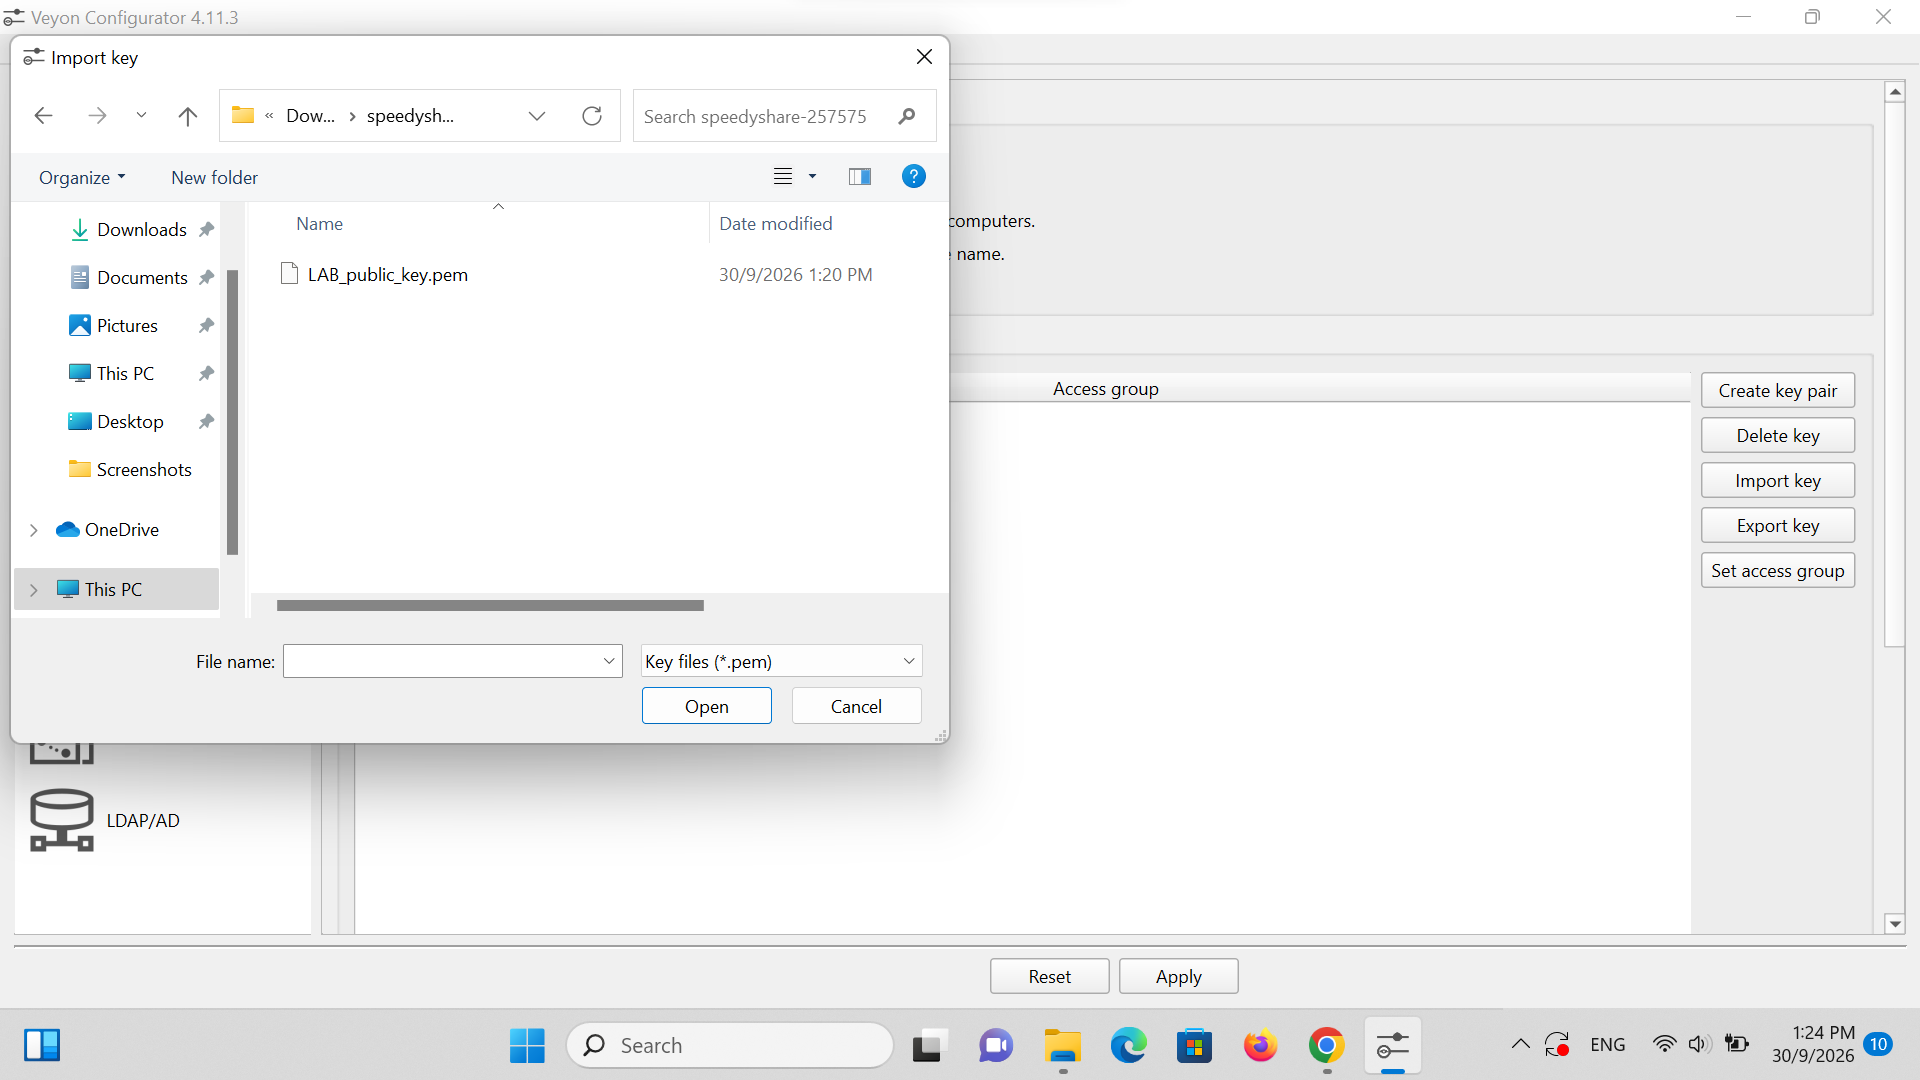
Import Teacher's Public Key & Click 'Apply'

Click the 'Authentication keys' tab in the left sidebar.
1. Click the 'Import key' button on the right.
2. Browse into the extracted speedyshare-257575 folder and select 'LAB_public_key.pem'.
3. Click Open. The key 'LAB (public)' will appear in the key list.
4. 🚨 MANDATORY STEP: Click the 'Apply' button at the bottom of the window to commit changes and restart the Veyon Service. Then close Configurator.
LAB_public_key.pem
⚠️ 🚨 TRAP TO AVOID: If you do not click 'Apply', Veyon will not save the key to Windows registry and the background service will not restart. Always click Apply!
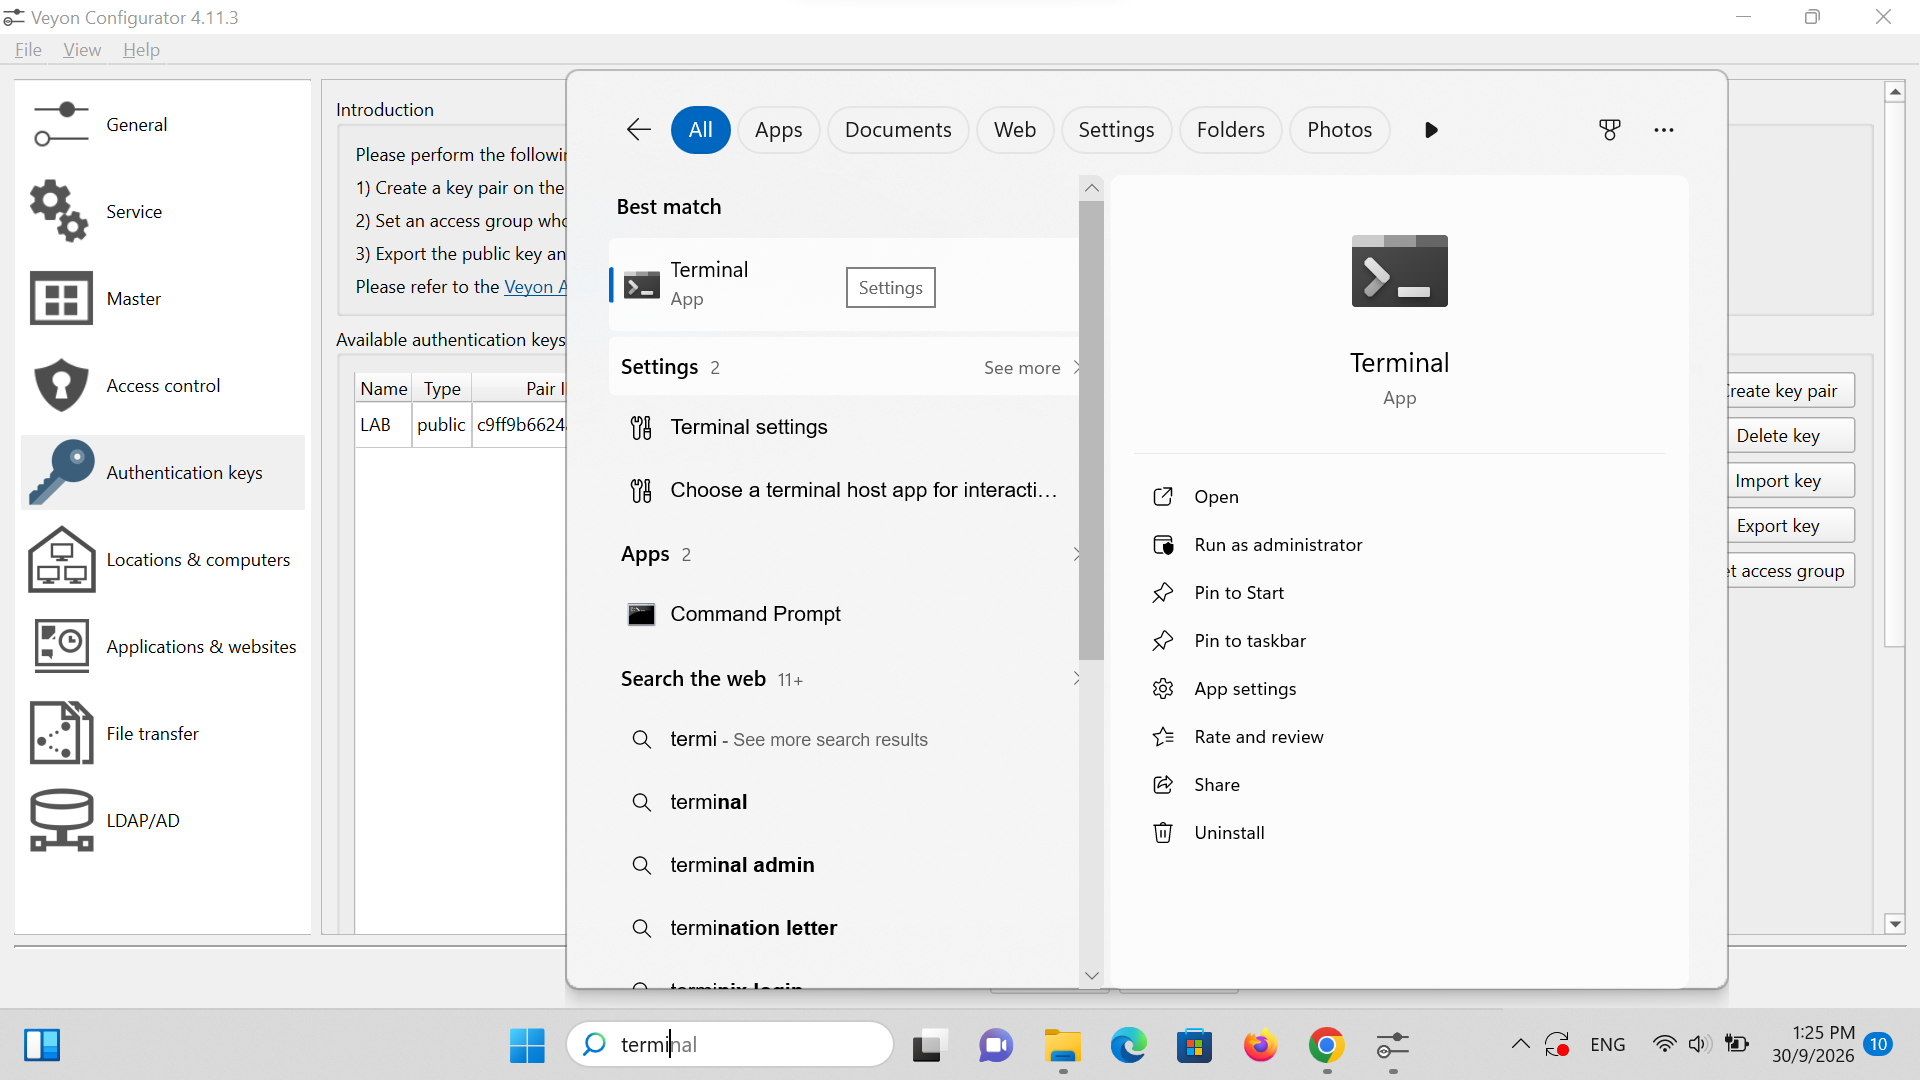
Langkah 18: Open Windows Terminal or Command Prompt
Klik untuk Skrin Penuh
LANGKAH 18 STUDENT LAPTOP (MURID)

Open Windows Terminal or Command Prompt

Press the Windows Start button or tap the Windows key.
1. Type 'terminal' (or 'cmd' / 'command prompt').
2. Click Terminal to open the command line console.
cmd
💡 Petua Teknikal: You need the command line to check this laptop's local IPv4 network address.
Langkah 19: Run ipconfig & Record IPv4 Address with Laptop Label
Klik untuk Skrin Penuh
LANGKAH 19 STUDENT LAPTOP (MURID)

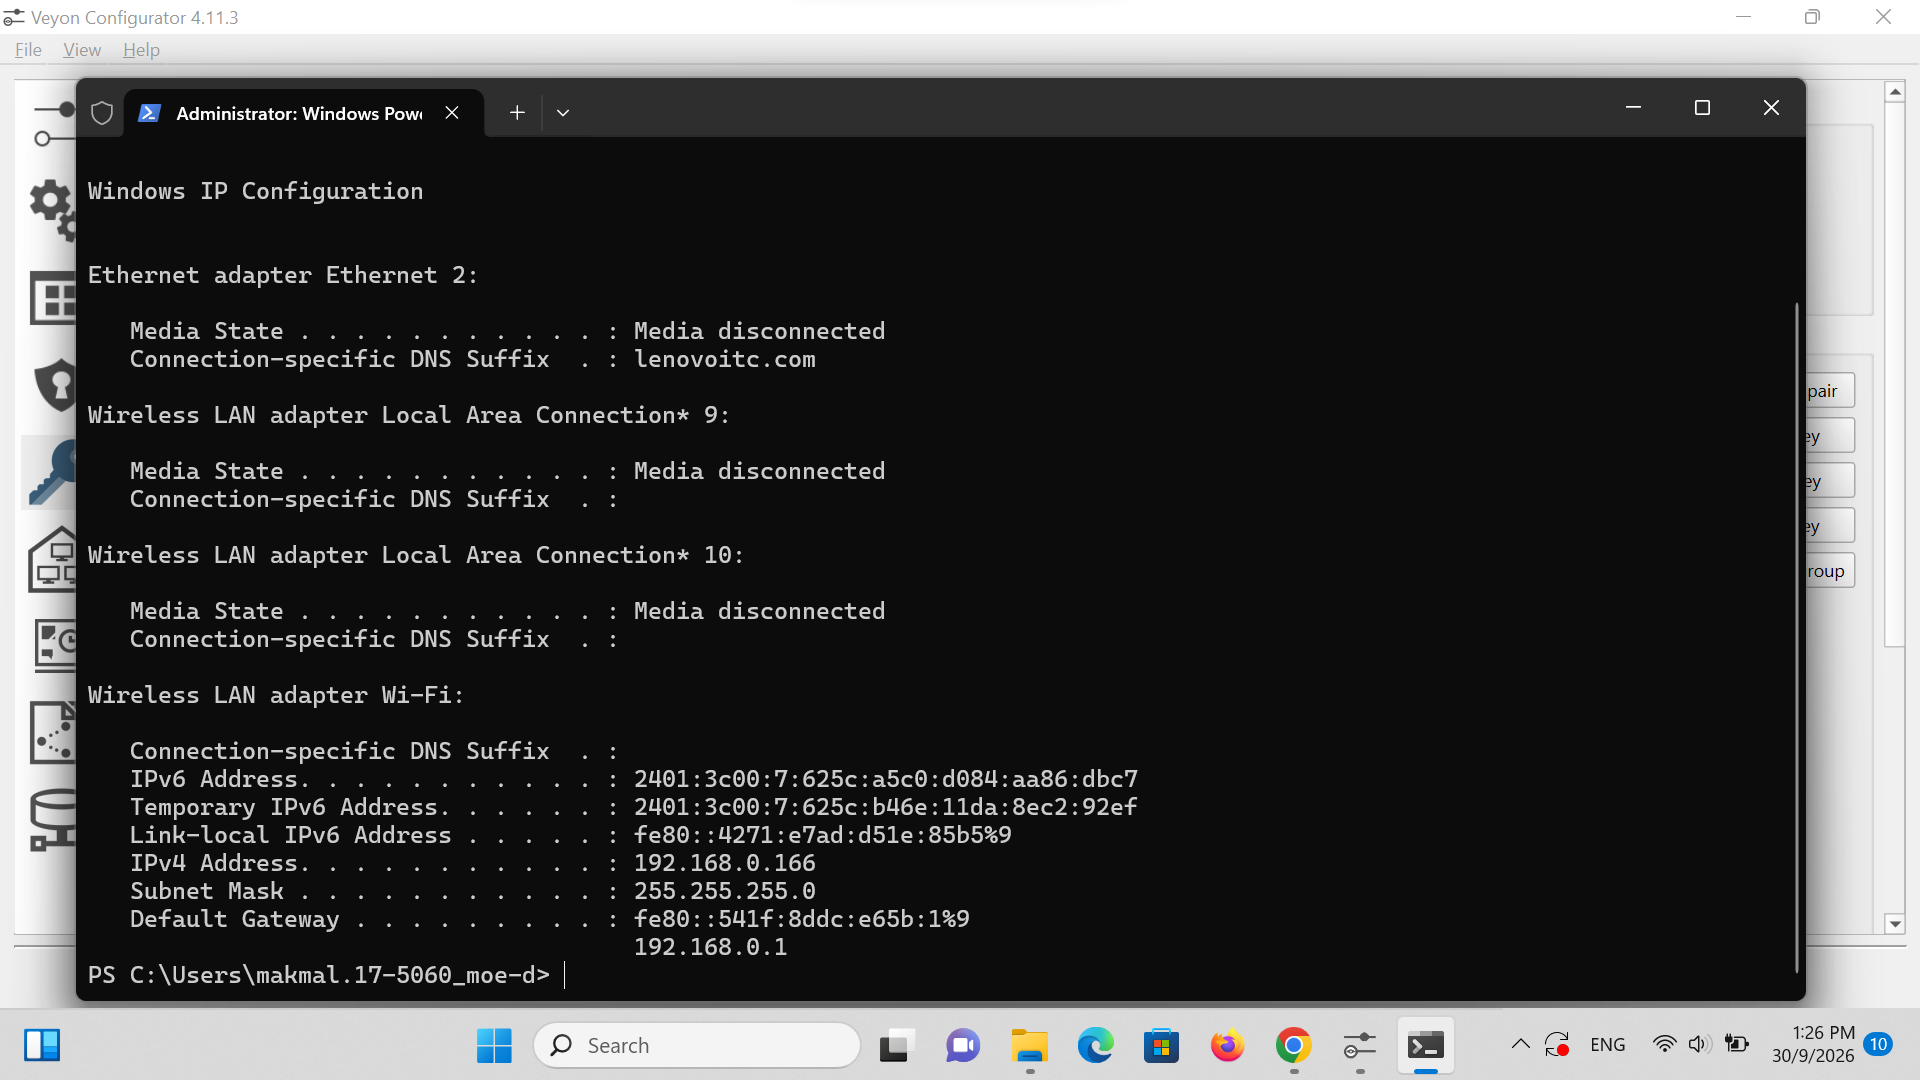
Run ipconfig & Record IPv4 Address with Laptop Label

In the terminal window, type 'ipconfig' and press Enter.
1. Scroll to the active Wi-Fi section ('Wireless LAN adapter Wi-Fi').
2. Note the 'IPv4 Address' (e.g. 192.168.0.166).
3. Check the physical sticker or number label on the laptop (e.g. Computer 17).
4. Write this pair down on a notepad: e.g. 'Computer 17 = 192.168.0.166'.
ipconfig
💡 Petua Teknikal: NETWORK PRO-TIP: If your school router uses dynamic DHCP without IP reservation, IPs might change after a reboot. You can also type 'hostname' in the terminal to jot down the computer's host name (e.g. MAKMAL-17), which remains permanent!
Langkah 20: Run firewall.bat as Administrator
Klik untuk Skrin Penuh
LANGKAH 20 STUDENT LAPTOP (MURID)

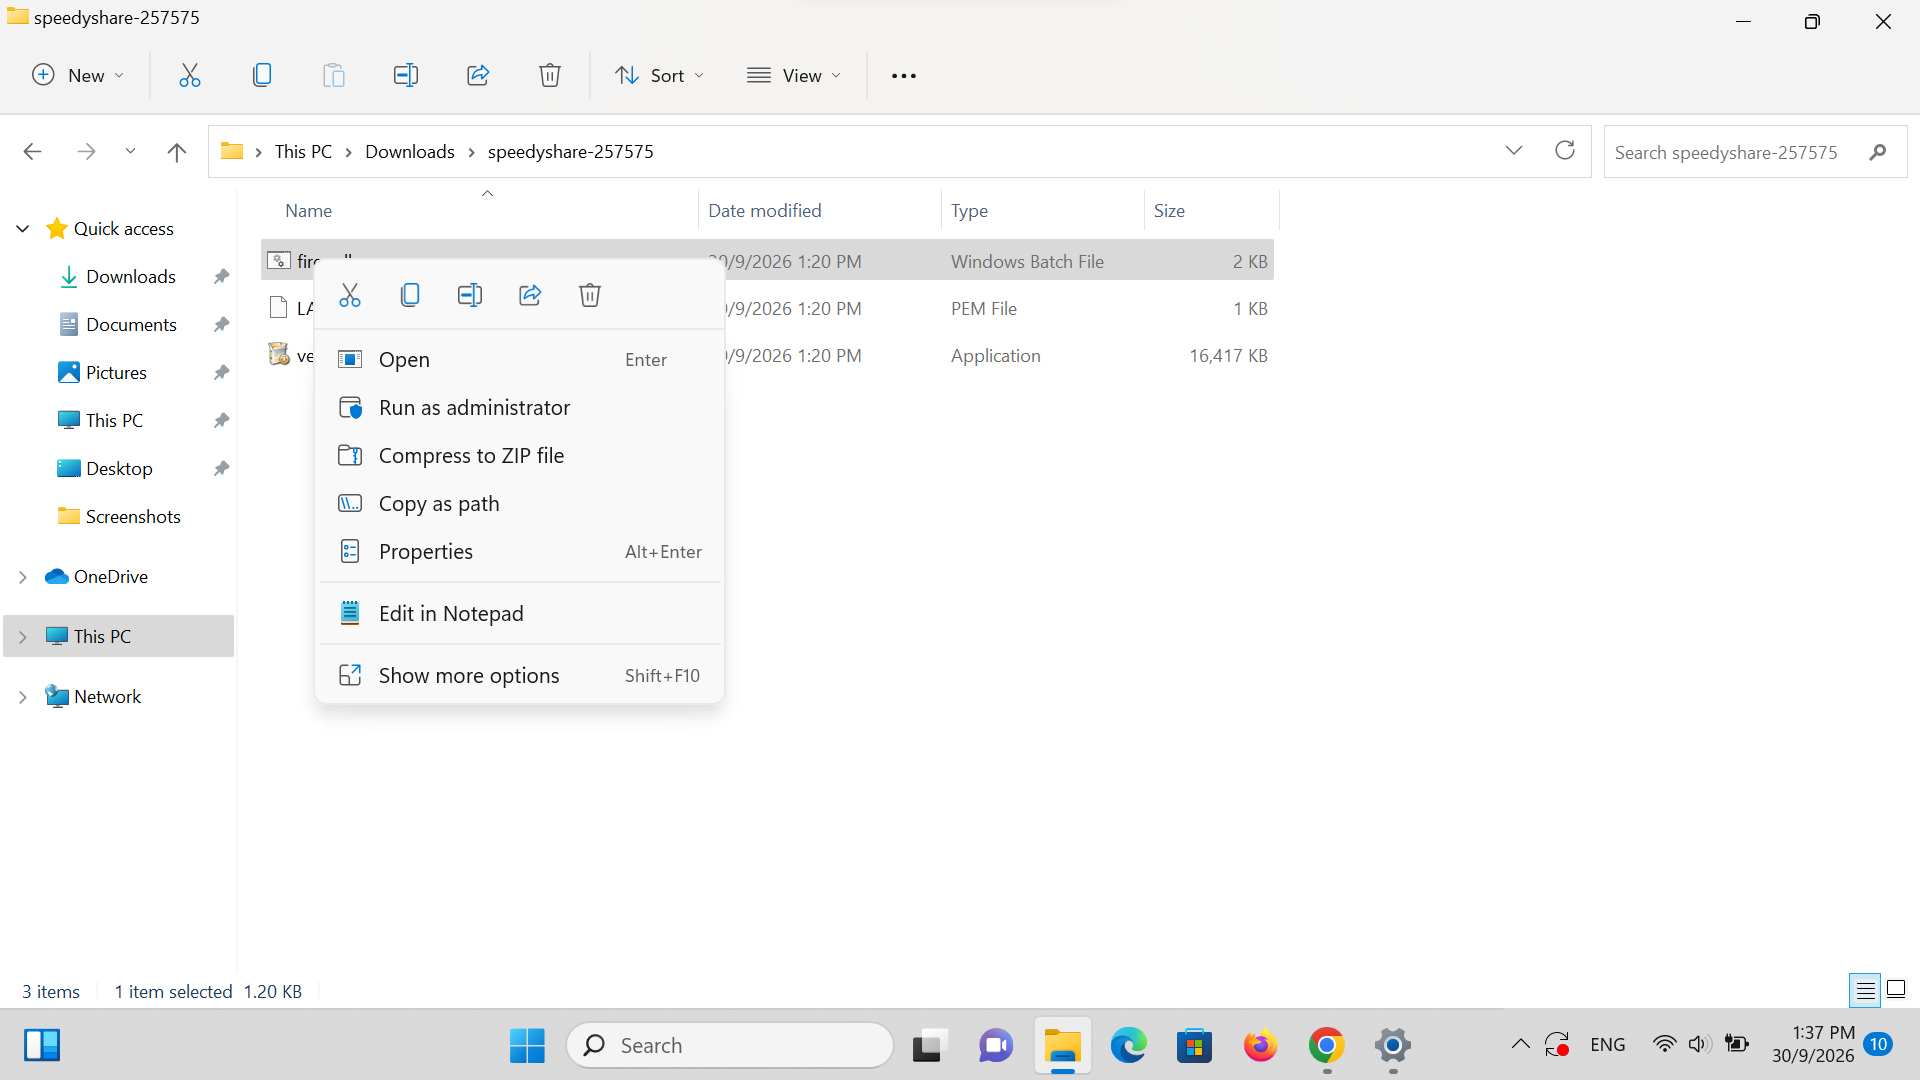
Run firewall.bat as Administrator

Go back to the extracted speedyshare-257575 folder in File Explorer.
1. Right-click on 'firewall.bat'.
2. Click 'Run as administrator'.
3. Click 'Yes' on the User Account Control (UAC) security prompt.
4. A black console window will flash briefly and close.
firewall.bat
💡 Petua Teknikal: This batch script configures Windows Defender Firewall to allow inbound connections on Veyon ports (11100, 11200, 11300, 11400). Without this, the student laptop will appear permanently offline on the teacher's screen.
Langkah 21: Return to Teacher PC: Add Classroom Lab Location
Klik untuk Skrin Penuh
LANGKAH 21 TEACHER PC (GURU)

Return to Teacher PC: Add Classroom Lab Location

Return to the Teacher laptop. Open Veyon Configurator.
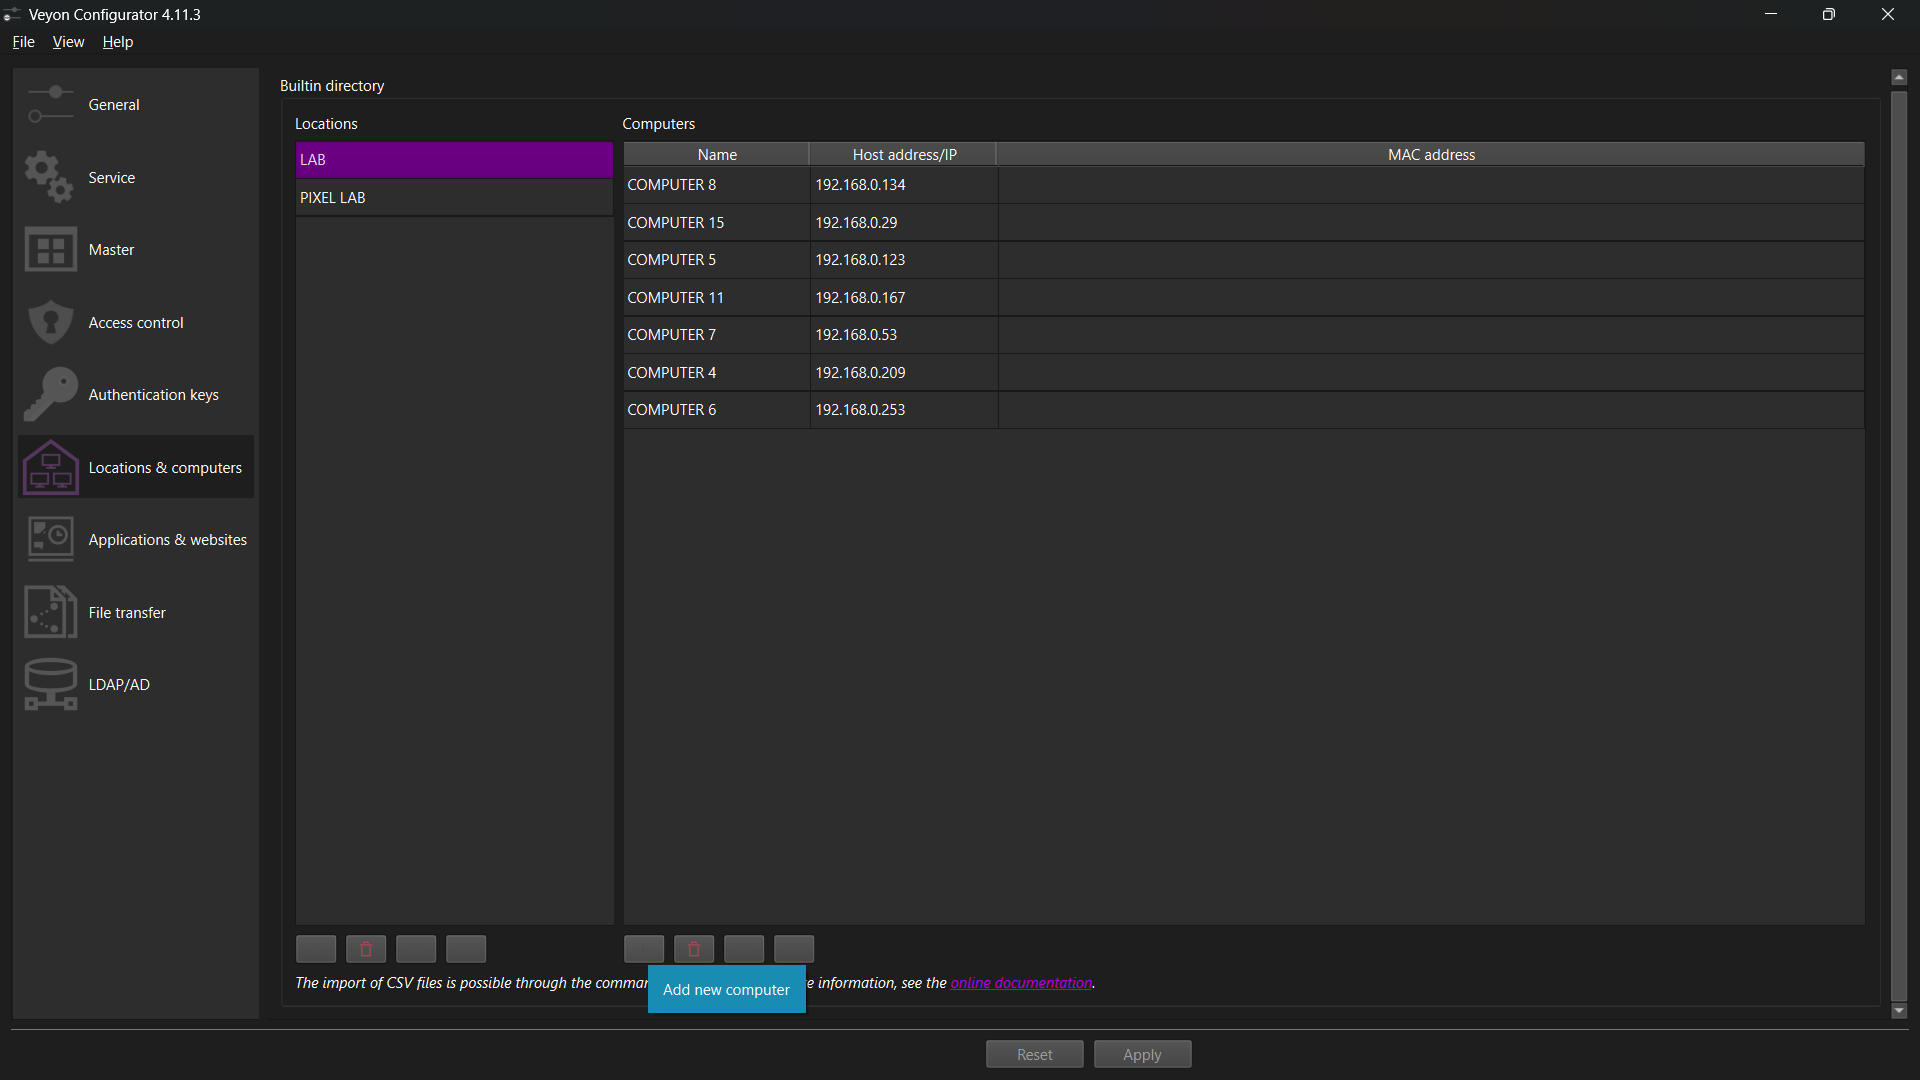
1. Click the 'Locations & computers' tab in the left sidebar.
2. Under the 'Locations' panel on the left, click the '+' button at the bottom.
3. Type your lab location name, such as 'LAB' (or 'MAKMAL').
🛑 Titik Semakan: STOP & CHECK: Before doing this step, make sure you have repeated Steps 9 through 20 across all student laptops and gathered your complete list of IP addresses on your notepad!
Langkah 22: Add Student Computer Entry under Location
Klik untuk Skrin Penuh
LANGKAH 22 TEACHER PC (GURU)

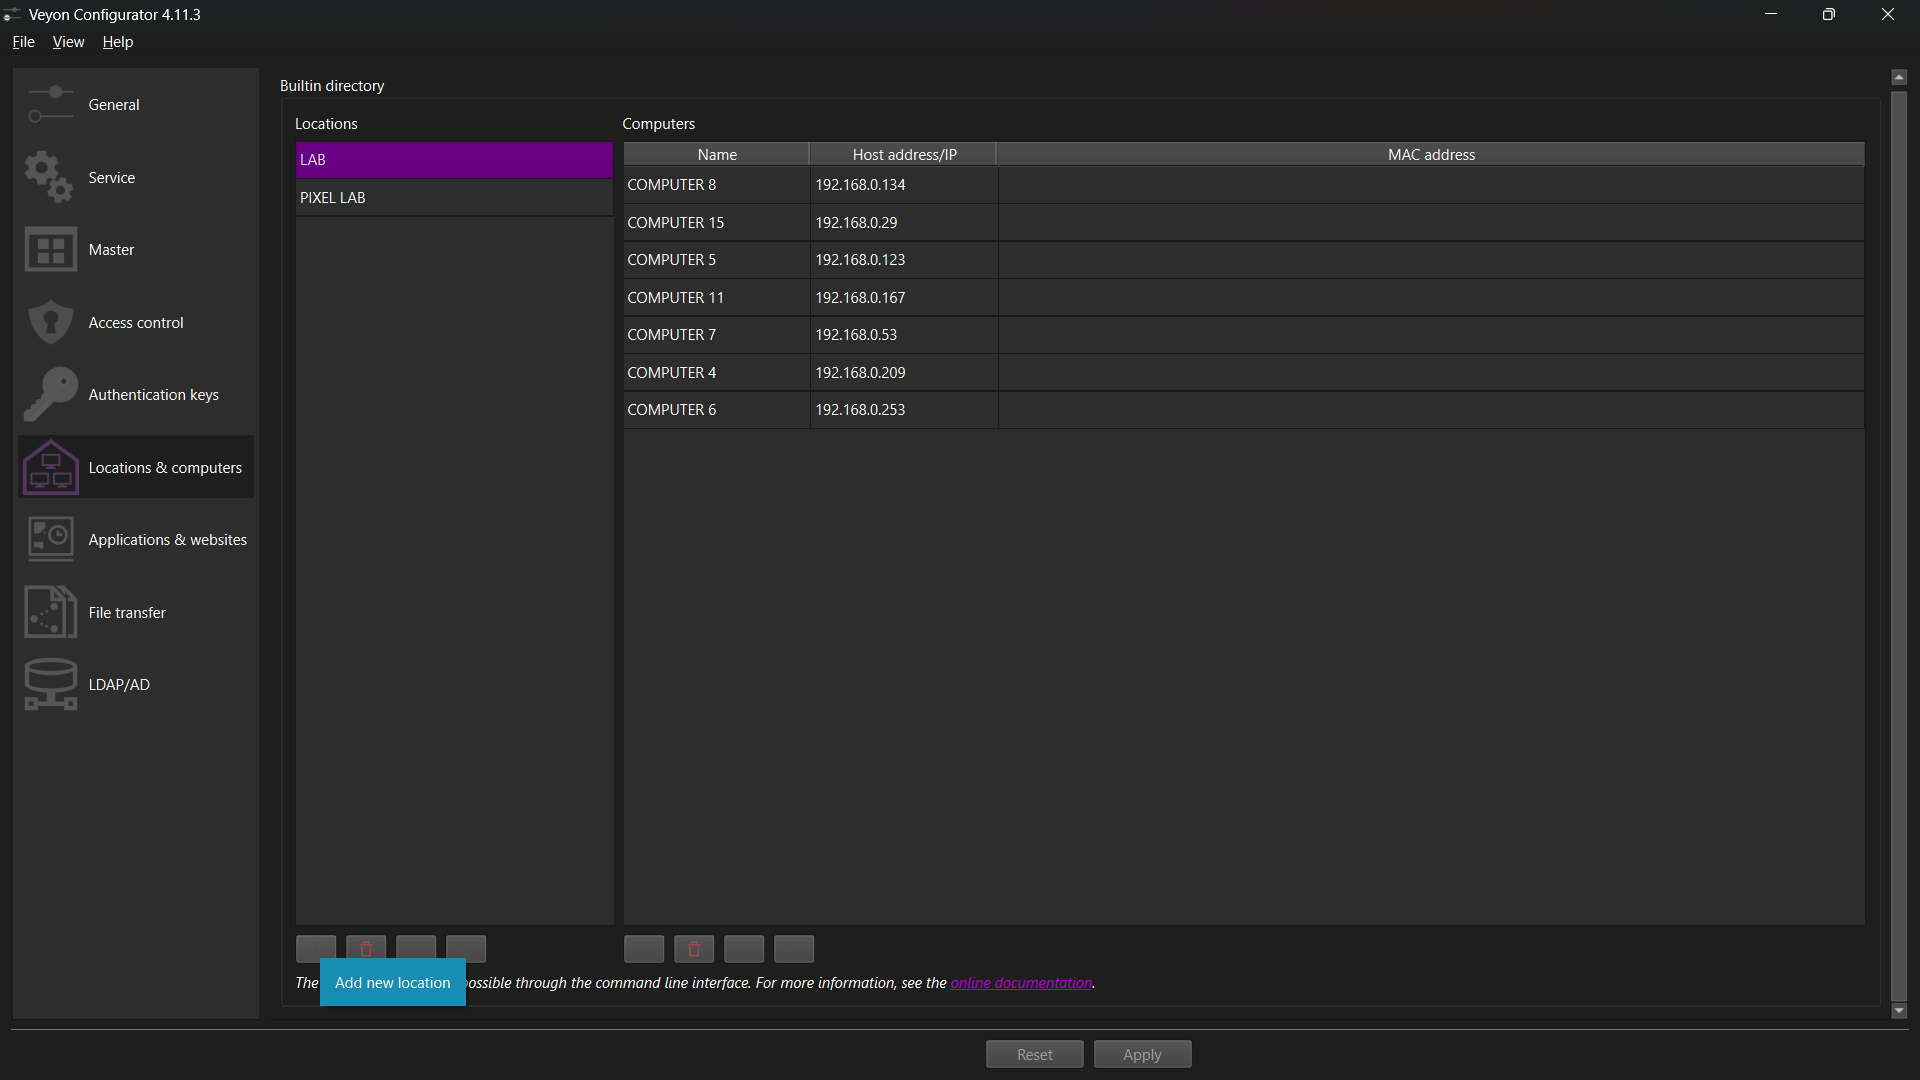
Add Student Computer Entry under Location

With your location ('LAB') highlighted on the left:
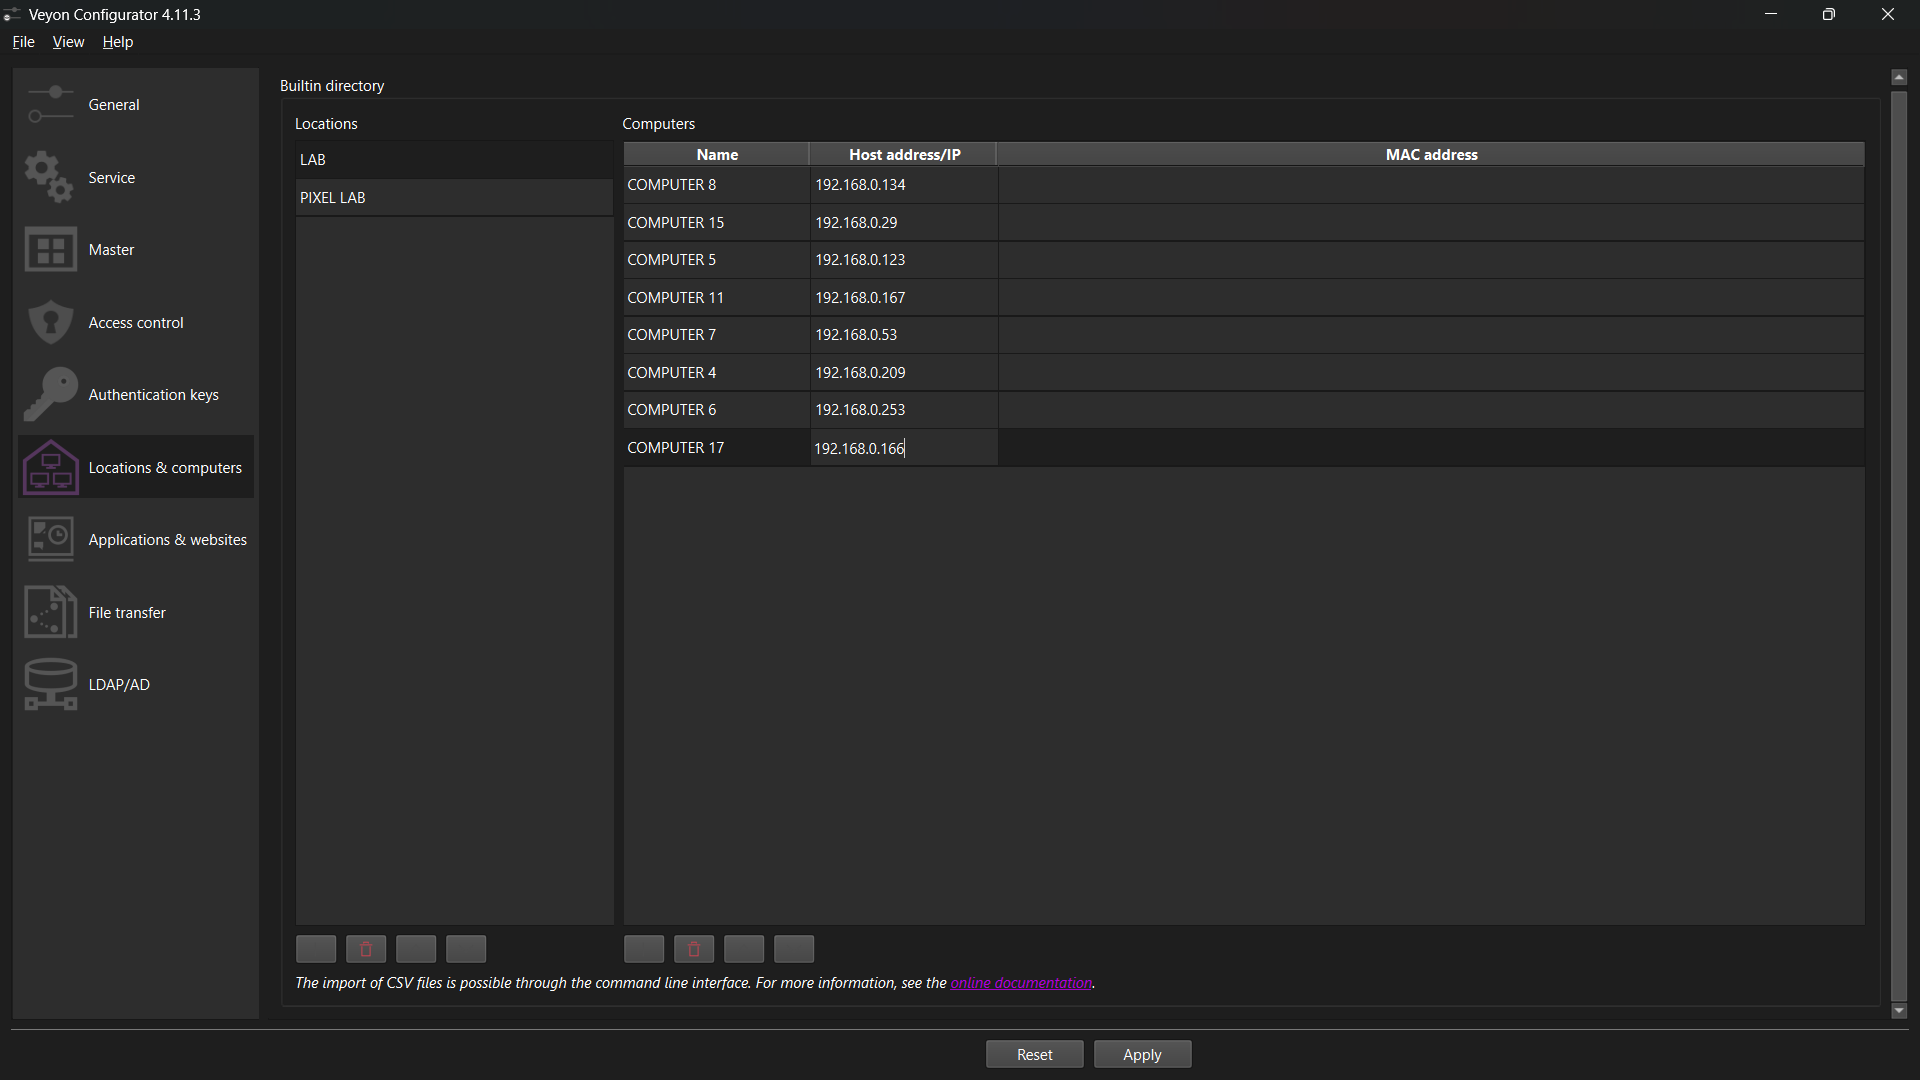
1. Click the '+' button at the bottom of the 'Computers' panel on the right.
2. In the 'Name' column, enter the computer label from your notes (e.g. 'COMPUTER 17').
💡 Petua Teknikal: Naming computers to match their physical lab desk stickers (e.g. COMPUTER 1, COMPUTER 2, etc.) makes it effortless to spot which student is off-task during class.
Langkah 23: Assign Recorded IP Address & Click 'Apply'
Klik untuk Skrin Penuh
LANGKAH 23 TEACHER PC (GURU)

Assign Recorded IP Address & Click 'Apply'

In the 'Computers' table:
1. Double-click the 'Host address/IP' column next to 'COMPUTER 17'.
2. Type in the recorded IPv4 address (e.g. 192.168.0.166).
3. Repeat adding rows for all other student computers from your notepad.
4. Click the 'Apply' button at the bottom to save your configuration. Close Veyon Configurator.
💡 Petua Teknikal: You can also type the computer's hostname if your school router supports local DNS resolution.
Langkah 24: Launch Veyon Master Application
Klik untuk Skrin Penuh
LANGKAH 24 TEACHER PC (GURU)

Launch Veyon Master Application

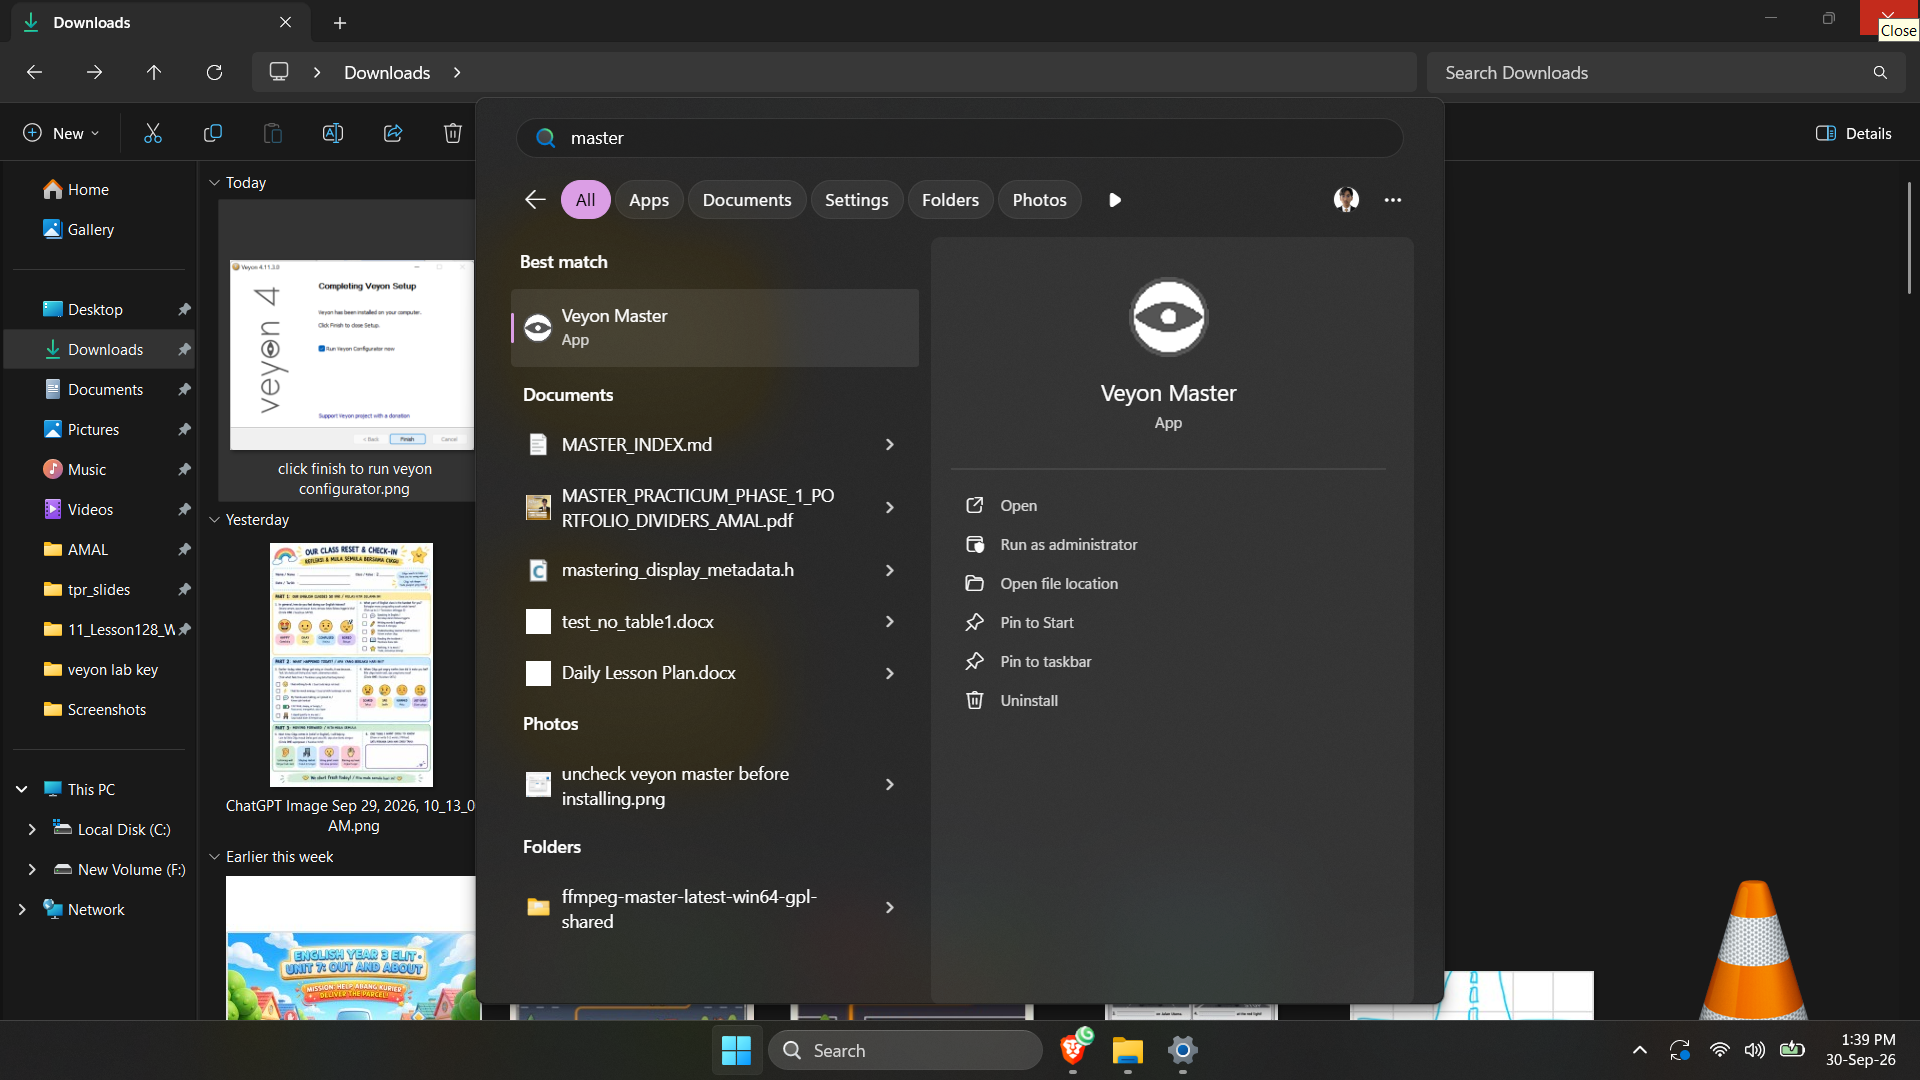
Open your Windows Start Menu.
1. Search for 'Veyon Master' (the black eye icon with green/pink aura).
2. Click Veyon Master to launch the classroom control console.
💡 Petua Teknikal: You can right-click Veyon Master and select 'Pin to taskbar' for one-click access during daily lessons.
Langkah 25: Toggle 'Locations & computers' Panel in Veyon Master
Klik untuk Skrin Penuh
LANGKAH 25 TEACHER PC (GURU)

Toggle 'Locations & computers' Panel in Veyon Master

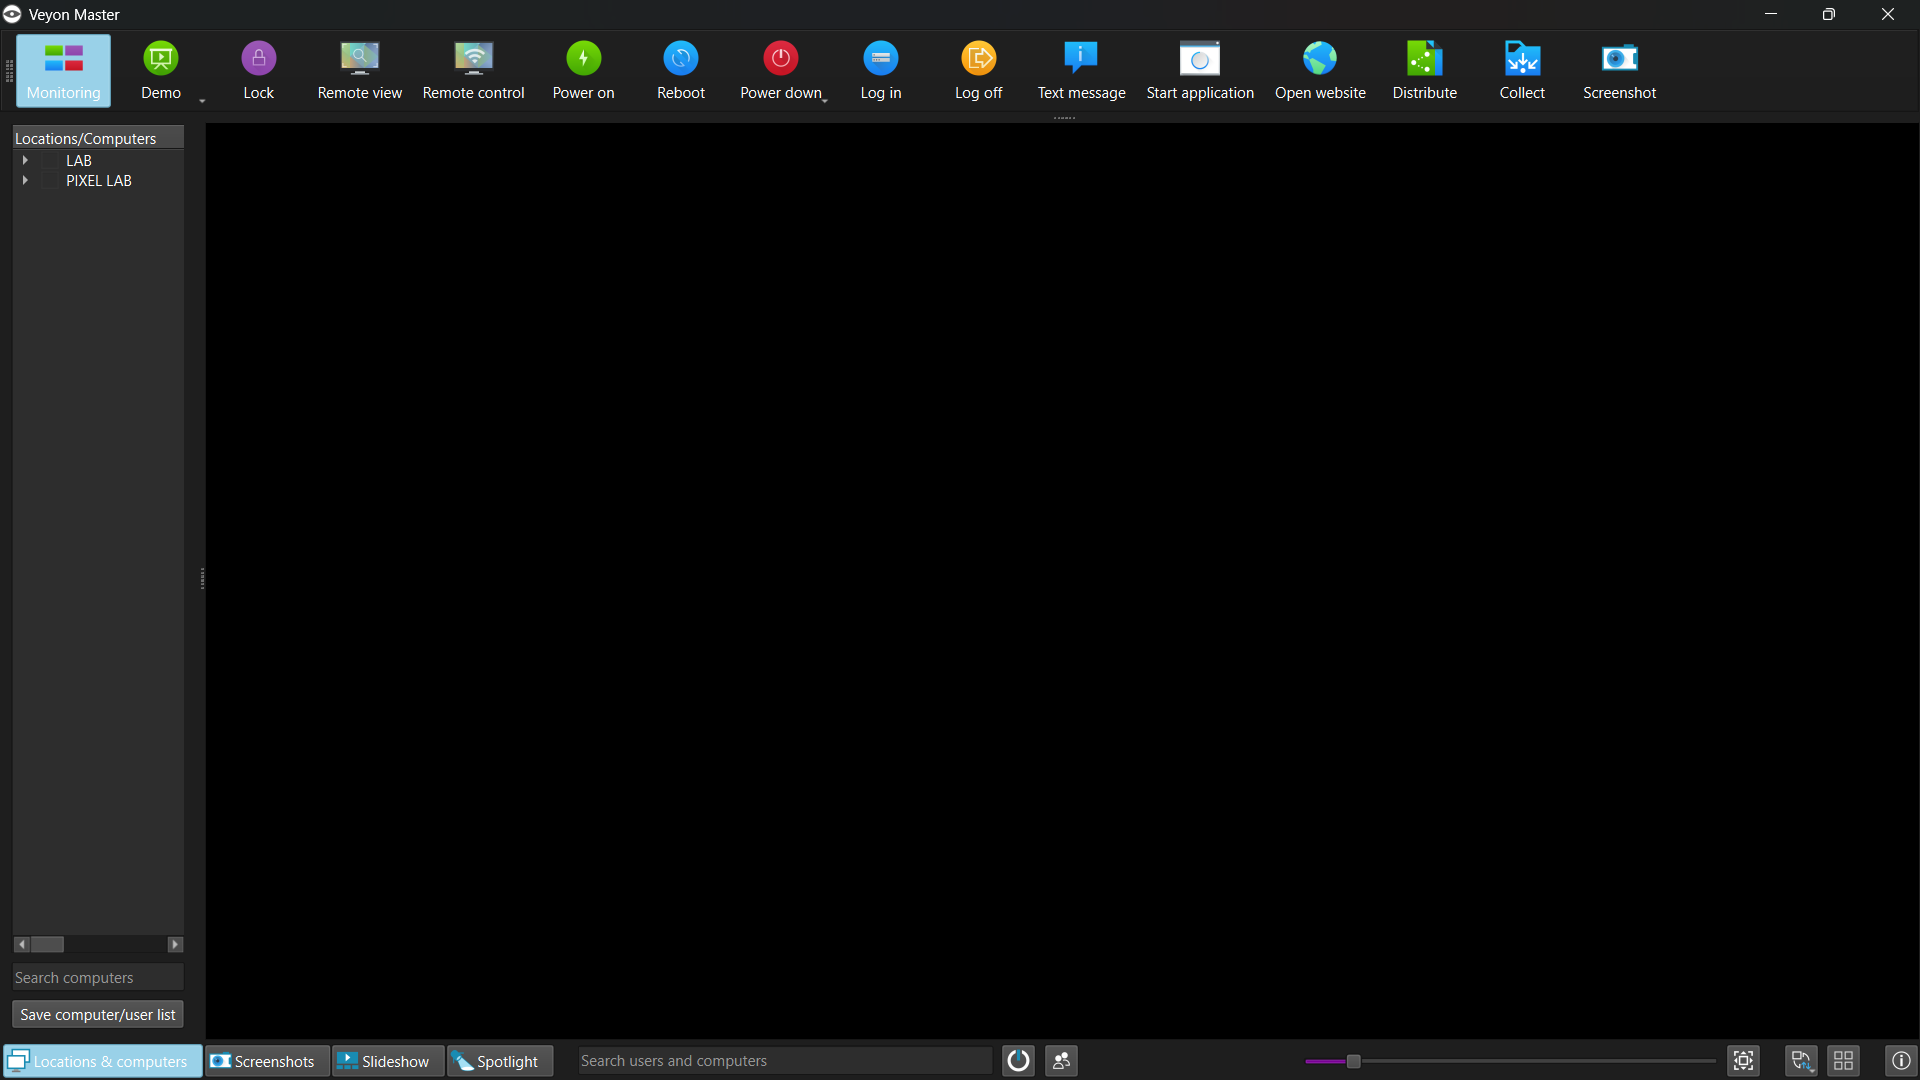
In the Veyon Master window, look at the bottom-left corner of the screen.
1. Click the 'Locations & computers' button.
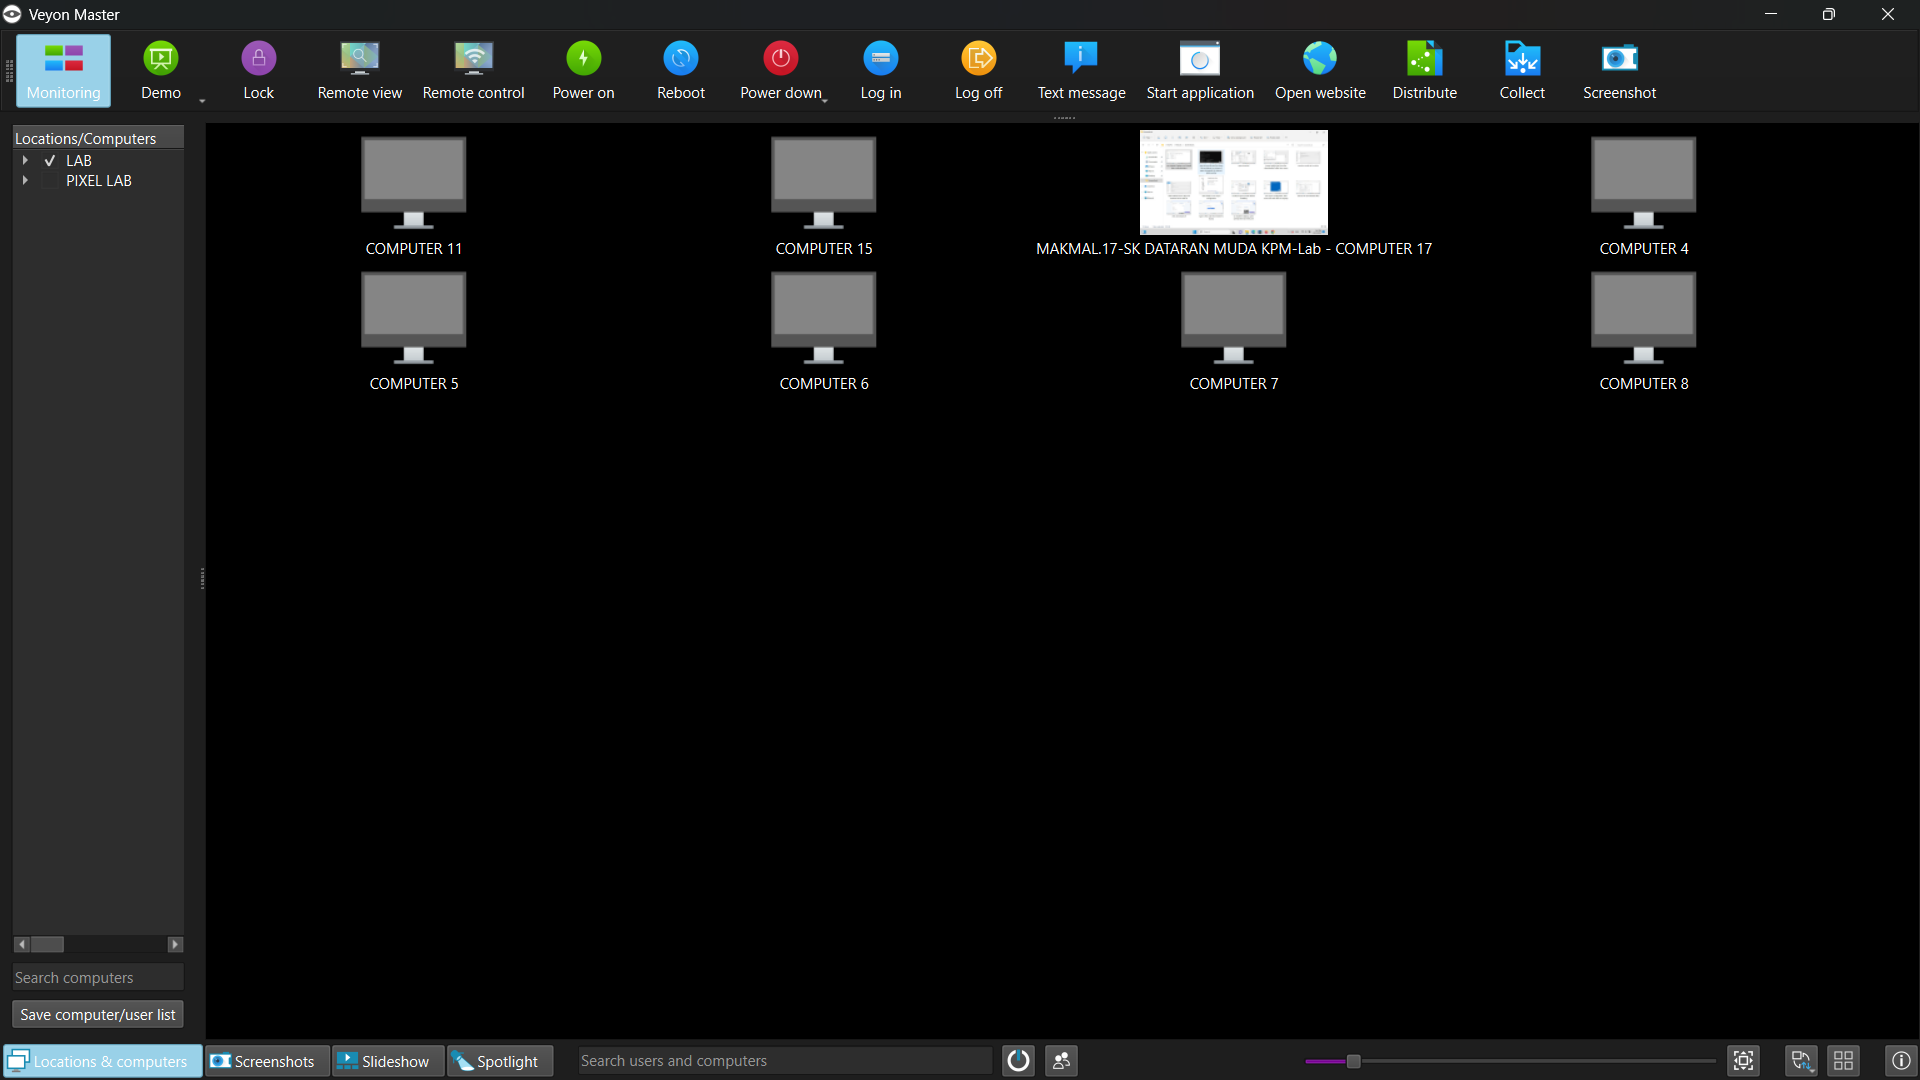
2. A sidebar will expand on the left showing your registered locations ('LAB', 'PIXEL LAB').
💡 Petua Teknikal: This sidebar allows you to switch between different computer labs or classes with a single click.
Langkah 26: Tick Location Checkbox & Monitor Live Student Screens!
Klik untuk Skrin Penuh
LANGKAH 26 TEACHER PC (GURU)

Tick Location Checkbox & Monitor Live Student Screens!

In the left sidebar under Locations/Computers, tick the checkbox next to your lab: '[✓] LAB'.
• Connected student screens immediately pop up in real-time grid view (e.g. MAKMAL.17-SK DATARAN MUDA KPM-Lab - COMPUTER 17 shows active live desktop!).
• Offline machines appear grayed out until powered on.
💡 Petua Teknikal: TEACHER POWER FEATURES: Double-click any screen thumbnail to view full screen. Use the top toolbar to 'Lock' screens, broadcast your screen ('Demo'), send a 'Text message', or 'Power down' all laptops at the end of class.
Langkah 1
Langkah 1

Download Required Setup Files from tr.ee/aJwAd

Open your web browser and navigate to tr.ee/aJwAd (or open the shared Google Drive folder). Download the two mandatory deployment files to your Downloads folder: veyon-4.11.3.0-win64-setup.exe (16 MB) and firewall.bat (1 KB).

TEACHER PC (GURU) Buka Slaid →
Langkah 2
Langkah 2

Run Installer & Check ALL Components (Master Included)

Double-click veyon-4.11.3.0-win64-setup.exe on the Teacher PC. Accept the license agreement. When you reach the 'Choose Components' window, make sure ALL THREE components are checked: • [✓] Veyon Service • [✓] Veyon Master (CRITICAL: Must be checked on Teacher PC) • [✓] Interception driver Then click Install.

TEACHER PC (GURU) Buka Slaid →
Langkah 3
Langkah 3

Complete Setup & Launch Veyon Configurator

Once the setup finishes copying files, the 'Completing Veyon Setup' window will appear. Ensure the checkbox '[✓] Run Veyon Configurator now' is checked, then click Finish.

TEACHER PC (GURU) Buka Slaid →
Langkah 4
Langkah 4

Set Authentication Method & Network Object Directory

In Veyon Configurator, select the 'General' tab from the left sidebar. 1. Under 'Authentication', set Method to: 'Key file authentication'. 2. Under 'Network object directory', set Backend to: 'Builtin (computers and locations in local configuration)'.

TEACHER PC (GURU) Buka Slaid →
Langkah 5
Langkah 5

Set Service Session Mode to Active & Apply

Click the 'Service' tab (gear icon) in the left sidebar. 1. Verify that 'State' shows Running. 2. Under 'Session mode', select the second radio button: 'Active session mode (single server instance for active local or remote session)'. 3. Click Apply at the bottom.

TEACHER PC (GURU) Buka Slaid →
Langkah 6
Langkah 6

Create Teacher Authentication Key Pair (LAB)

Click the 'Authentication keys' tab (key icon) in the left sidebar. 1. Click the 'Create key pair' button on the right. 2. Enter a name for your key pair, such as 'LAB' (or your school lab name). 3. Click OK. Veyon generates two keys: LAB (private) and LAB (public).

TEACHER PC (GURU) Buka Slaid →
Langkah 7
Langkah 7

Export Public Key (LAB_public_key.pem)

In the key list, click on 'LAB (public)' to highlight it. 1. Click the 'Export key' button on the right. 2. Save the file with the default name 'LAB_public_key.pem' into your Downloads folder. 3. Click Save.

TEACHER PC (GURU) Buka Slaid →
Langkah 8
Langkah 8

Upload Deployment Package to SpeedyShare (Browser P2P)

Open your web browser and go to speedyshare.app. 1. Drag and drop or upload all THREE deployment files: a. veyon-4.11.3.0-win64-setup.exe b. LAB_public_key.pem c. firewall.bat 2. Note the 6-digit Share Code (e.g. 257575) and QR Code generated on screen.

TEACHER PC (GURU) Buka Slaid →
Langkah 9
Langkah 9

On Student Laptop: Open SpeedyShare & Click Join

Sit at the student laptop (e.g. Computer 17). Ensure it is connected to the same Wi-Fi network as the teacher. 1. Open Google Chrome or Microsoft Edge. 2. Navigate to speedyshare.app. 3. Click the blue 'Join' button in the top right corner.

STUDENT LAPTOP (MURID) Buka Slaid →
Langkah 10
Langkah 10

Enter Teacher's 6-Digit Share Code

On the 'Enter your Share code' prompt, type the 6-digit code shown on the teacher's screen (e.g. 257575) into the box, then click the blue 'Submit' button.

STUDENT LAPTOP (MURID) Buka Slaid →
Langkah 11
Langkah 11

Click 'Download all (3)' to Retrieve Package

The 3 shared files will appear on screen. Click the blue 'Download all (3)' button. A single compressed zip file named speedyshare-257575.zip will be saved to the student's Downloads folder.

STUDENT LAPTOP (MURID) Buka Slaid →
Langkah 12
Langkah 12

Extract the Downloaded Zip Archive

Open File Explorer and navigate to Downloads. 1. Right-click speedyshare-257575.zip. 2. Click 'Extract All...'. 3. Click Extract. This creates an uncompressed folder containing all 3 files.

STUDENT LAPTOP (MURID) Buka Slaid →
Langkah 13
Langkah 13

Launch Installer & Bypass Windows SmartScreen

Inside the extracted folder, double-click veyon-4.11.3.0-win64-setup.exe. 1. When the blue Windows Defender SmartScreen banner appears stating 'Windows protected your PC', click the small underlined 'More info' link. 2. Click the 'Run anyway' button that appears at the bottom.

STUDENT LAPTOP (MURID) Buka Slaid →
Langkah 14
Langkah 14

CRITICAL: UNCHECK 'Veyon Master' on Student Laptop

On the 'Choose Components' setup screen: • [✓] Veyon Service (KEEP CHECKED) • [ ] Veyon Master -> 🚨 UNCHECK THIS BOX! • [✓] Interception driver (KEEP CHECKED) Click Install, then click Finish (ensure 'Run Veyon Configurator now' is checked).

STUDENT LAPTOP (MURID) Buka Slaid →
Langkah 15
Langkah 15

Configure Student Authentication & Builtin Backend

In Veyon Configurator (Light Theme): 1. Select the 'General' tab. 2. Under 'Authentication', set Method to: 'Key file authentication'. 3. Under 'Network object directory', set Backend to: 'Builtin (computers and locations in local configuration)'.

STUDENT LAPTOP (MURID) Buka Slaid →
Langkah 16
Langkah 16

Set Student Service Session Mode to Active

Click the 'Service' tab in the left sidebar. 1. Verify that 'State' shows Running. 2. Under 'Session mode', select 'Active session mode (single server instance for active local or remote session)'.

STUDENT LAPTOP (MURID) Buka Slaid →
Langkah 17
Langkah 17

Import Teacher's Public Key & Click 'Apply'

Click the 'Authentication keys' tab in the left sidebar. 1. Click the 'Import key' button on the right. 2. Browse into the extracted speedyshare-257575 folder and select 'LAB_public_key.pem'. 3. Click Open. The key 'LAB (public)' will appear in the key list. 4. 🚨 MANDATORY STEP: Click the 'Apply' button at the bottom of the window to commit changes and restart the Veyon Service. Then close Configurator.

STUDENT LAPTOP (MURID) Buka Slaid →
Langkah 18
Langkah 18

Open Windows Terminal or Command Prompt

Press the Windows Start button or tap the Windows key. 1. Type 'terminal' (or 'cmd' / 'command prompt'). 2. Click Terminal to open the command line console.

STUDENT LAPTOP (MURID) Buka Slaid →
Langkah 19
Langkah 19

Run ipconfig & Record IPv4 Address with Laptop Label

In the terminal window, type 'ipconfig' and press Enter. 1. Scroll to the active Wi-Fi section ('Wireless LAN adapter Wi-Fi'). 2. Note the 'IPv4 Address' (e.g. 192.168.0.166). 3. Check the physical sticker or number label on the laptop (e.g. Computer 17). 4. Write this pair down on a notepad: e.g. 'Computer 17 = 192.168.0.166'.

STUDENT LAPTOP (MURID) Buka Slaid →
Langkah 20
Langkah 20

Run firewall.bat as Administrator

Go back to the extracted speedyshare-257575 folder in File Explorer. 1. Right-click on 'firewall.bat'. 2. Click 'Run as administrator'. 3. Click 'Yes' on the User Account Control (UAC) security prompt. 4. A black console window will flash briefly and close.

STUDENT LAPTOP (MURID) Buka Slaid →
Langkah 21
Langkah 21

Return to Teacher PC: Add Classroom Lab Location

Return to the Teacher laptop. Open Veyon Configurator. 1. Click the 'Locations & computers' tab in the left sidebar. 2. Under the 'Locations' panel on the left, click the '+' button at the bottom. 3. Type your lab location name, such as 'LAB' (or 'MAKMAL').

TEACHER PC (GURU) Buka Slaid →
Langkah 22
Langkah 22

Add Student Computer Entry under Location

With your location ('LAB') highlighted on the left: 1. Click the '+' button at the bottom of the 'Computers' panel on the right. 2. In the 'Name' column, enter the computer label from your notes (e.g. 'COMPUTER 17').

TEACHER PC (GURU) Buka Slaid →
Langkah 23
Langkah 23

Assign Recorded IP Address & Click 'Apply'

In the 'Computers' table: 1. Double-click the 'Host address/IP' column next to 'COMPUTER 17'. 2. Type in the recorded IPv4 address (e.g. 192.168.0.166). 3. Repeat adding rows for all other student computers from your notepad. 4. Click the 'Apply' button at the bottom to save your configuration. Close Veyon Configurator.

TEACHER PC (GURU) Buka Slaid →
Langkah 24
Langkah 24

Launch Veyon Master Application

Open your Windows Start Menu. 1. Search for 'Veyon Master' (the black eye icon with green/pink aura). 2. Click Veyon Master to launch the classroom control console.

TEACHER PC (GURU) Buka Slaid →
Langkah 25
Langkah 25

Toggle 'Locations & computers' Panel in Veyon Master

In the Veyon Master window, look at the bottom-left corner of the screen. 1. Click the 'Locations & computers' button. 2. A sidebar will expand on the left showing your registered locations ('LAB', 'PIXEL LAB').

TEACHER PC (GURU) Buka Slaid →
Langkah 26
Langkah 26

Tick Location Checkbox & Monitor Live Student Screens!

In the left sidebar under Locations/Computers, tick the checkbox next to your lab: '[✓] LAB'. • Connected student screens immediately pop up in real-time grid view (e.g. MAKMAL.17-SK DATARAN MUDA KPM-Lab - COMPUTER 17 shows active live desktop!). • Offline machines appear grayed out until powered on.

TEACHER PC (GURU) Buka Slaid →